The Wingtra team from Zurich and around the globe is excited to welcome you as a valuable customer. Thank you for your trust, and you can be sure that we will do our best to support you with your mapping projects.
Note: This quick start guide is meant for WingtraOne GEN II users. If you have a WingtraRAY drone, visit this page.
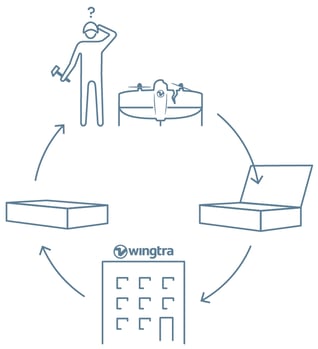
Know the rules before you fly
The regulatory environment for drone operations is constantly changing. For the most up-to-date information go to: knowledge.wingtra.com/regulations
Learn more at knowledge.wingtra.com
Give feedback at feedback.wingtra.com
Open a ticket at knowledge.wingtra.com/kb-tickets/new
Get help by writing to support@wingtra.com
Unbox
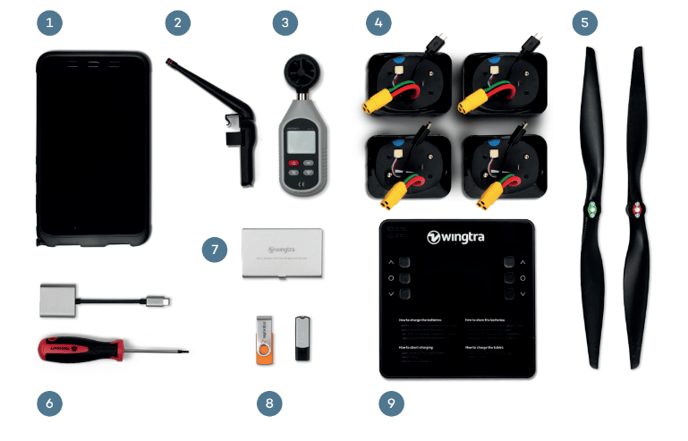
Make sure you received all items from the next two sections (“Drone”, “Pilot box”).
Keep the original packaging
In case of an incident, Wingtra Support might request a return of the equipment to Wingtra's office.
Drone
- Propellers
- Battery compartment
- Top cover: access to camera, PPK and electronics
- Motors
- Middle stand
- Distance sensor
- Flaps
- Side stands

Pilot box
- Tablet
- Telemetry and its cable
- Wind measurement tool
- Flight batteries (2 sets)
- Spare Propellers
- Screwdriver and tablet SD card adapter
- SD card holder (SD card comes with the camera)
- USB sticks
- Charger for flight batteries and tablet
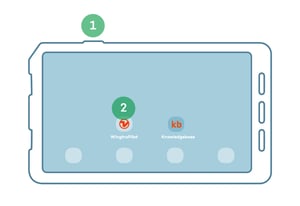
Create an account on my.wingtra.com and set up your drone
1. Start the tablet
2. Open the WingtraPilot app
3. Follow the set up instructions on the WingtraPilot screen
You cannot operate your drone until it has been set up by following the steps above.
If you are having difficulty with creating an account or setting up your drone, please use the following link to find out more information: https://knowledge.wingtra.com/en/drone-activation-for-customers
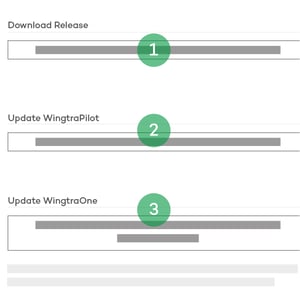
Update the software
Connect your tablet to the internet (WiFi). Update WingtraPilot if you receive a pop-up telling you that there is a new software update available. Skip this step if there is no pop-up.
- Download the latest release
- Update WingtraPilot
- Update WingtraOne—follow the steps described in WingtraPilot
Learn more about the update process at knowledge.wingtra.com/update-wingtrapilot-wingtraone
Install WingtraHub on your Windows PC
WingtraHub is Wingtra’s application on Windows. You will need it to geotag the images after flight, and you can use it for flight planning instead of WingtraPilot.
Download WingtraHub here: knowledge.wingtra.com/install-wingtrahub.
2. Before you go into the field - WingtraOne GEN II
Do not fly in


- Fog
- Snow or rain
- Strong continuous winds*
- Extreme temperatures
- High altitude **
Use return to home (RTH) if conditions change while flying!
*8 m/s (18 mph) continuous wind speed measured on ground corresponds to approx 10 m/s (22 mph) surface wind
** With high altitude propellers up to 4800 m (15’700 ft) AMSL *** . Learn more about high altitude flying at knowledge.wingtra.com/high-altitude.
*** AMSL: Above mean sea level
Download offline maps
If you do not have an internet connection in the field, you can download a map beforehand. To do so:

- Open the "Settings" tab
- Select “Offline maps”
- Select “New offline map”
- Navigate to the desired location, either by dragging the street map or by using the search function
- Give the set a descriptive name
- Choose a map type
- Check the box "Include elevation data" if you require terrain following—this is always recommended
- Adjust zoom levels if needed—14-18 is the recommended setting
- Select "Download"
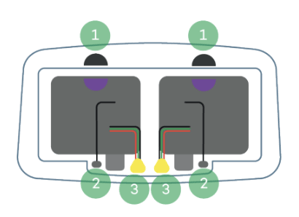
Charge your batteries
.png?width=313&height=269&name=Charge%20batteries_charge%20batteries%20(1).png)
- Power the battery charger
- Connect the charger output cables to the charger first and only then to the batteries
- On the side of the charger that the battery has been inserted into, press and hold the middle of the three buttons for 1 second
- On the display screen, ensure the "task" is set to "charge" before navigating to and selecting "start"
- Use the central USB port to charge your tablet
Once the battery has begun charging, the charger screen will turn red. When the charging is finished the screen will turn green momentarily before resting in blue. It is now safe for you to disconnect the battery from the charger output cable.
Keep your batteries healthy


- Do not expose them to sun
- Before flying, keep them at a moderate temperature
-
For longer storage, keep them at room temperature and charged at 60% capacity
For longer storage, keep them at room temperature and at 60% capacity. To do this perform the following steps:
- Connect a battery using the adapter cable
- Press and hold the middle button
- Set “task” to “Storage”, then select “Start”
- Repeat process of the other battery
3. Set up your flight plan
Create a flight plan


- Open WingtraPilot and select “New” to create a new flight plan
- Give your flight plan a descriptive name, select the camera, and select “Next”
- Import a KML file or skip if you want to plan from scratch
You can also plan your flights in WingtraHub (PC). Learn more at knowledge.wingtra.com/en/flight-planning-in-wingtrahub .
LIDAR
If you’re flying a Wingtra LIDAR mapping sensor, find all the information you need here: https://knowledge.wingtra.com/en/lidar-general-setup.
Center your map

- Use the "Center" or "Search" function to locate the area of interest
- Click on "WingtraOne" to center the map on the current drone location
Create a home point and set the transition height


- Tap the "Plan" and then "Home" icon to create a home point at the planned take-off location; it will be updated once connected to the drone
- Adjust transition height and direction; it's the same for take-off and landing
Home point and transition height explained

- Home point is the place where your WingtraOne takes off and lands
- Transition height is where your drone transitions into a forward flight mode
Always set the transition height at least 20 m (65 ft) above obstacles, but not too high! Increased transition height reduces flight time.
Create area(s) or corridor(s)
An "area" or a "corridor" is where you want your WingtraOne to fly and capture the data.


- Add one or several areas by clicking on "Plan" and then "Area"
- If you are using the corridor feature, click on "Plan" and then "Corridor"
- Move the corners until you have outlined the area(s); you can also move the position of the area(s) by moving the A1/A2 bubble in the middle
- When necessary, loiter waypoints are automatically inserted between two areas; additional waypoints can be inserted manually to ensure safe flight paths between areas and back to the home point

Adjust parameters
Important

- "Terrain following"—make sure the box is ticked especially when flying over hilly terrain
- "Height above ground" and "Ground sampling distance"—define at what height your drone should fly to get the required GSD
Optional

- "Flight direction"—set the angle of your flight direction, if possible perpendicular to the wind direction
- "Side overlap" and "front overlap" is based on percentage, and >60% is recommended (consult knowledge.wingtra.com for more detailed recommendations)
Optional "corridor" parameters

- Define the corridor width
- Switch start and end point
- Turn flight direction 90°, e.g., if the terrain is steep
Adjust safety parameters

Minimum and maximum height above ground
These parameters define the minimum and maximum height above ground for the flight of the drone.
If the drone cannot fly within these parameters, take off will be denied.
Sections where these safety parameters cannot be respected will be highlighted in red on the altitude graph.
Recommended minimum height is 10 m (30 ft) higher than the tallest object in your area.

Connection loss timeout
This parameter defines the maximum time a telemetry connection can be lost until a flight is aborted and Return to Home (RTH) is triggered.
Increase this value if you are flying beyond visual line of sight (BVLOS) or if you are flying in environments where the telemetry connection cannot be maintained (e.g. due to the topography of the area of operation).
The drone will still collect data, if the telemetry connection is lost during the flight. However, the user interface in WingtraPilot will not be updated in real time.

Safe Return To Home (RTH)
The drone will fly home on a safe path. This may not be a direct path to home, depending on the planned mission or topography of the area of operation.
Safe RTH is triggered if:
- The drone flies beyond your geobarrier
- The connection between operator and drone is lost
- Battery gets low
You can adjust the thresholds for the triggers in the “Safety” box of your flight plan.

Adjust geobarrier
Geobarrier type: Circle

This type of geobarrier confines the drone's flight area to a circle with the home point at the center. If the drone crosses this geobarrier, the Return to Home command is triggered automatically.
The dimension of this geobarrier type may be adjusted with the radius, measuring the distance from the home point to the geobarrier.
Geobarrier type: Polygon

This type of geobarrier confines the drone's flight area to a polygon shape. This shape may be modified by moving, adding or removing corner points.
If the drone should cross this geobarrier, the Return to Home command is triggered automatically.
To create a geobarrier from a KML file, drag the imported KML polygon onto the geobarrier settings window.
Optional: if you're using WingtraGROUND for your field set-up, see the full article here
5. Prepare for take-off
Power your drone

- Put the batteries in the battery compartment; use the battery pair that has the same color-coded half circles—the half circles on the batteries and on the drone should match
- Plug in the two smart battery cables
- Plug in the two smart power cables
Unplug the flight batteries after the flight to power off the drone. If the drone is left powered during transport, the flaps are at risk to get damaged.
Assemble your ground station

Ground stations are not interchangeable between drones. Make sure that the drone ID matches the ID of the ground station.
The telemetry connection between drone and tablet operates on 2.4016 to 2.4776 GHz (EIRP: 19,8 dBm)."
Optionally, you can operate the WingtraOne with a secondary RC link that operates on 2.405 to 2.474 GHz (EIRP: 19,5 dBm)."
Learn more about the RC at knowledge.wingtra.com/manual-flying.
Measure the wind speed


Use the wind measurement tool to measure the wind speed.
Don't measure the wind speed while standing behind big objects, e.g., buildings or trees. Raise the tool above your head to get the most accurate results.
Drone tipping expectations
In calm conditions, WingtraOne lands smoothly on its tail. In windy conditions, the aircraft can tip over upon landing. Generally this is not a problem and damages rarely occur.
| Measured on ground* | Surface wind** | Tipping expectations |
| 0-5 m/s (0-11 mph) | 0-7 m/s (0-16 mph) | Tippings rarely occur |
| 5-8 m/s (11-18 mph) | 7-10 m/s (16-22 mph) | Tippings can occur |
| >8 m/s (>18 mph) | >10 m/s (>22 mph) | Not recommended to fly |
* As measured with the wind measurement tool from the pilot box—approx 2 m (7 ft) above the ground
** As referenced in most weather forecasts—approx 10-20 m (33-66 ft) above the ground
Avoid obstacles
Be aware that the obstacle clearance zone should correspond to the wind conditions. The stronger the wind, the farther from obstacles the drone should be.
Distance to objects in different wind conditions:
< 5 m/s (< 11 mph) continuous wind speed

> 5 m/s (> 11 mph) continuous wind speed


Generally, it is recommended to fly in open, obstacle-free areas.
When not keeping the recommended distance from objects, you risk crashing the drone because of drift or turbulence.
Turbulence occurs close to tall buildings, cliffs, mountains and valleys.
Take-off position in wind
When placing the drone for take-off, make sure that it is positioned parallel to the wind direction.
Parallel to wind

Perpendicular to wind

Prepare for take-off


- Firmly insert the middle stand until you hear a click and, holding the motors, place the drone on the take-off point
- Make sure the take-off point is a safe distance from people and obstacles
- Place it on even ground, making sure it doesn't sink into mud and that the grass surrounding it is not too high
Go through checklist and take off

- Select the checklist
- Follow the instructions
- Once all the checklist items are green, press the button to take off
6. During the flight
Stay alert
Observe your airspace during flight and take action if needed:
- Return to home if it starts to rain or if an aircraft enters your airspace
- Pause in cruise if you are unsure about the planned flight or need time to think
- Pause in hover to reposition the drone for landing


Pause and reposition the WingtraOne during landing

If your landing spot is not free, you can pause WingtraOne during landing, reposition it, and land at another location:
- Pause the landing and take control by pressing the pause button
Watch the video to learn how to reposition WingtraOne through WingtraPilot at knowledge.wingtra.com/reposition-wingtraone-at-landing

- Adjust position with the left/right/forward/back controls on the right side. “Forward” means “towards the camera.”
- Adjust the altitude or turn WingtraOne around its axis with the controls on the left side (up/down/turning).
- Land at the current position with the land button. Alternatively, you can press the “down” button until you land.
Emergency shut-off


As the last option, in dangerous situations, it is possible to immediately switch off the motors of WingtraOne at any time in-flight.
- Press the red button with a cross
- Slide to confirm in the Emergency shut-off screen
Careful! Emergency shut-off cuts the motors instantly, and the drone will fall on the ground. We hope that you never need to use this feature.
7. Geotag your data
To geotag your collected data


- Install WingtraHub on your computer; find instructions at knowledge.wingtra.com
- Take the SD card out of the camera inside the drone and copy the WingtraPilotProjects folder to your computer
- Open WingtraHub
- Open the WingtraPilotProjects folder
- Select the projects you want to process and press "Next"
- Tick the “Output geotagged images” box to generate a copy of the images with EXIF/XMP geotags and untick the option to only output the CSV file. Note that generating the geotagged images requires more processing time and more storage space
- Press "Start processing"
Learn more about geotagging of MicaSense Altum, RedEdge and RedEdge-P data.
If you’re flying a Wingtra LIDAR mapping sensor, find all the information you need here: https://knowledge.wingtra.com/en/lidar-general-setup
Optional for PPK data geotagging:

Add "Base file(s)" from your computer—select all available RINEX files.
Then add "Base location" as follows:
- Select "Add new"
- Enter the coordinates of the base and give a descriptive name
- Select "Save"
- Select "Select"

8. Analyze your data
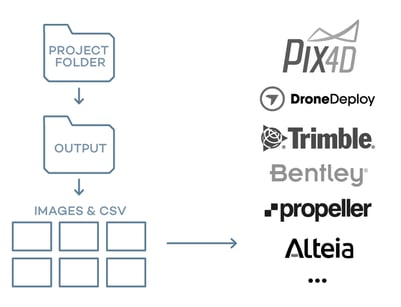
Load your data on a photogrammetry software
Data captured with WingtraOne is compatible with all major post-processing tools. Prepare it as follows, and start analyzing:
- Once the geotagging in WingtraHub is finished, locate your results in the WingtraPilotProjects folder on your computer's file explorer
- Navigate to the folder "ProjectName"
- Locate the "OUTPUT" folder
- From there, upload the images and the CSV files to your preferred photogrammetry software
For Wingtra LIDAR data, please refer to https://knowledge.wingtra.com/en/lidar-general-setup
You are good to go! Thank you for using WingtraOne in your surveying operations.
Contact us at support@wingtra.com if you have any questions.