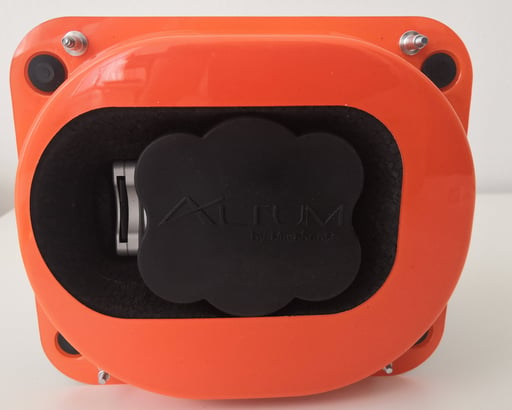
Micasense Altum is a radiometric calibrated camera that integrates a thermal sensor with five high-resolution narrow bands, producing advanced thermal and multispectral imagery. It features more functionalities and slightly different requirements than WingtraOne's RGB payloads, so it requires a different workflow. The following information will guide you on how to use this combination and acquire your multispectral data successfully.
- In the WingtraPilot welcome menu, create a new flight plan, and select "Micasense Altum" as the camera
- Plan your flight as described in the Create a new flight plan
- Perform the pre-flight procedure as it is described in the Pre-flight checklist. The steps that are additional to the RGB workflow are described below.
Configuring and calibrating Altum
- Configure and calibrate Altum on WingtraOne GEN II
- Configure and calibrate Altum on WingtraOne GEN I
1. Configure and calibrate Altum on WingtraOne GEN II
All the flight planning parameters are set in WingtraPilot, as the image triggering is controlled by the drone.
In the Preflight checklist the camera check is automatically performed. 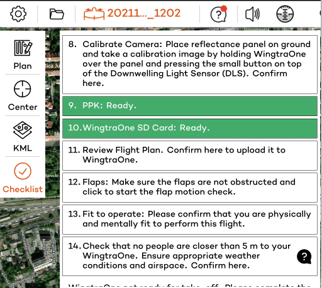

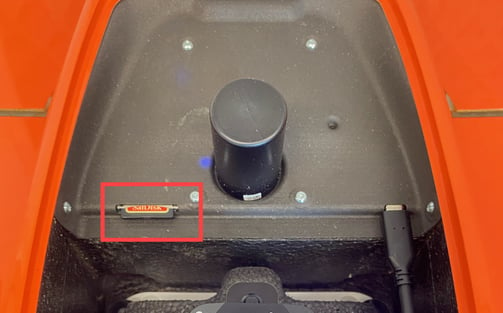
On item 8 of the checklist, you'll see the Altum camera needs to be calibrated with the provided reflectance panel. Only a timely calibration guarantees reliable spectral information of your covered flight area. For optimal calibration, make sure to take a calibration image before and after each flight.
To calibrate the camera:
- Place the reflectance tag flat onto level ground and make sure no reflective surfaces are near it
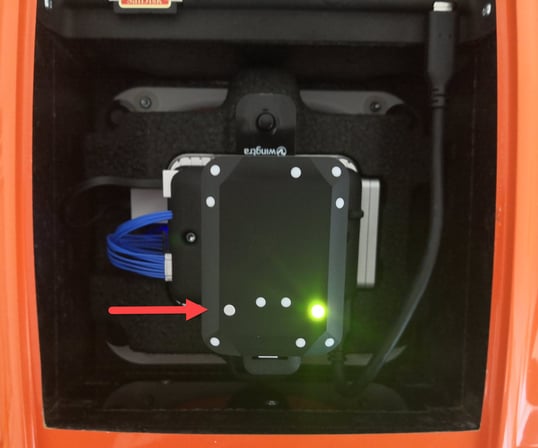
- Lift WingtraOneup, and hold it with the camera facing the reflectance tag, at about one meter (3 ft) above it. Make sure to hold it level, and do not cover the reflectance tag with a shadow from you or the drone

- Trigger the image physically using the button the DLS sensor (see picture below) for a few seconds as indicated with the arrow below:
Once the calibration panel image is captured, click on the checklist item to confirm it.
2. Configure and calibrate Altum on WingtraOne GEN I
On item 8 of the checklist, you have to configure the Altum camera to match the desired flight plan parameters in a separate camera user interface. This user interface can be accessed via Wifi and web browser (Chrome). You can use the tablet itself or any other device such as your smartphone.
To configure Altum:
- Power on WingtraOne
- Connect via Wifi to the the camera (SSID = Altum // password = micasense)
- Open the browser app (Chrome) and access the page http://192.168.10.254
- Go to status tab (house icon). Check the free space on the SD card, GPS signal reception, and time
- Go to the configure tab (gear icon). Under Basic Configuration, set Auto-Capture Mode to Overlap. Set the target altitude to the altitude of your flight plan. Set Along-Track Overlap to the frontal overlap of your flight plan. Press Save
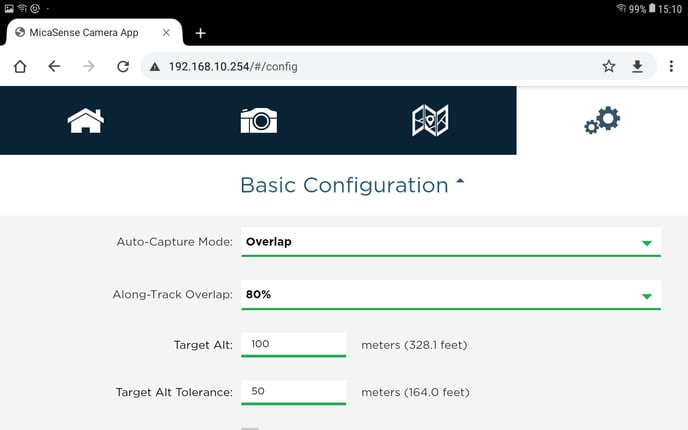
- The flight path is defined by WingtraPilot parameters (flight altitude, flight direction, and side overlap). The image triggering is set by the MicaSense web user interface (based on target altitude and frontal overlap). For consistency, specify all parameters in both user interfaces correctly.
- The Target Altitude Tolerance is a distance that is used to make sure that pictures are captured throughout the whole mission. If you are flying on a rugged terrain, please make to set a higher Tolerance.
- Before choosing the Target Altitude and Target Altitude Tolerance, check the Altitude Graph in WingtraPilot. If you're using Terrain Following, the WingtraOne might be flying a mission at different heights in relation to the Home Point. Please make sure the Target Altitude and the Target Altitude Tolerance set match the defined mission altitude.
- For further details check out the camera configuration section in the troubleshooting article.
On item 9 of the checklist, you'll see the Altum camera needs to be calibrated with the provided reflectance panel. Only a timely calibration guarantees reliable spectral information of your covered flight area. For optimal calibration, make sure to take a calibration image before and after each flight.
To calibrate the camera:
- Make sure the SD card is inserted in the Altum camera
- Place the reflectance tag flat onto level ground and make sure no reflective surfaces are near it
- Power the camera by plugging in the WingtraOne flight batteries. Lift it up, and hold it with the camera facing the reflectance tag, at about one meter (3 ft) above it. Make sure to hold WingtraOne level, and do not cover the reflectance tag with a shadow from you or the drone
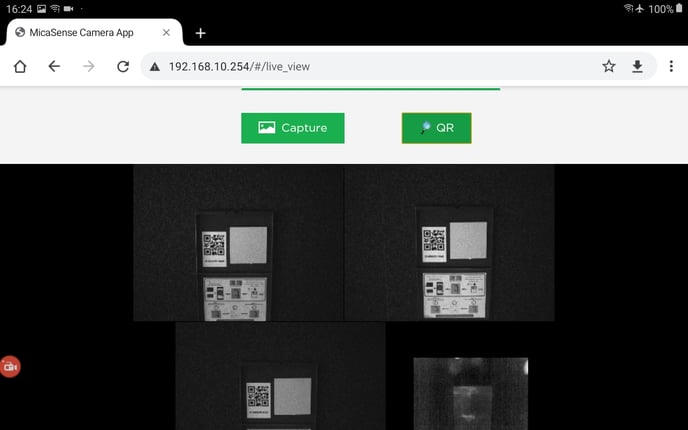
- Perform automatic panel detection in QR mode. The camera starts beeping when the QR button is pressed. You can press the button before placing the drone above the reflectance tag. Pay attention to the camera beeping. As soon as the beeping stops, the images have been taken. Alternatively, you can use the capture button to take the picture. This requires first to place the drone above the reflectance tag and then to press the button.
Fly the mission
- Complete the preflight checklist and start the flight
- After landing, take another calibration image by holding WingtraOne over the reflectance tag and then shut off the WingtraOne
Data organization
1. Data organization WingtraOne GEN II Altum
- After shutting off WingtraOne Altum, retrieve the SD card from the camera by the camera SD card into the camera before pulling it. The camera SD card contains the images, which are stored in folders ("0000SET", "0001SET",...)
- The images are already non PPK geotagged. The metadata, such as geolocation, is written to the EXIF of each image
- The images are stored in folders (“0000SET”, “0001SET”, ...). A new folder is created each time the camera is powered up or if the maximal number of images per folder is reached
- For every trigger event, the information from each spectral band is saved in a separate image. The last number on the name of the file corresponds to the band it captured. The thermal band is number 6 (eg: IMG_0001_6)
- Then, remove the WingtraOne SD card that is inserted into the drone. The WingtraPilotProjects folder, containing the GNSS data, is saved to the WingtraOne SD card.
- WingtraOne GEN II Altum images can be PPK geotagged. PPK geotagging is possible in WingtraHub. See the full process to PPK geotag multispectral images in the article: PPK geotagging for multispectral imagery.
2. Data organization WingtraOne GEN I Altum
- After shutting off WingtraOne Altum, retrieve the SD card from the camera by pushing the SD into the camera before pulling it out.
Do not pull the SD card out of the camera without pushing it in first. Pulling the SD card out directly can break the SD card reader.
- The SD card contains the images, which have already automatically been geotagged. The metadata, such as geolocation, is written to the EXIF of each image
- The multispectral images are stored in folders (“0000SET”, “0001SET”, ...). For every trigger event, the information from each spectral band is saved in a separate image. A new folder is created each time the camera is powered on or if the maximal number of images per folder is reached.
- The last number on the name of the file corresponds to the band it captured. The thermal band is number 6 (eg: IMG_0001_6)
Processing the information
For processing the information from the Micasense Altum we recommend using Agisoft Metashape or Pix4D Mapper. Follow the link to see the tutorial on how to process the images and generate the outputs.
More information
For more information about the WingtraOne Altum setup, please have a look at the Set up the MicaSense Altum camera article.