The checklist differs slightly depending on the camera you are flying with. Click here for RedEdge specific pre-flight checks and here for Altum specific pre-flight checks.
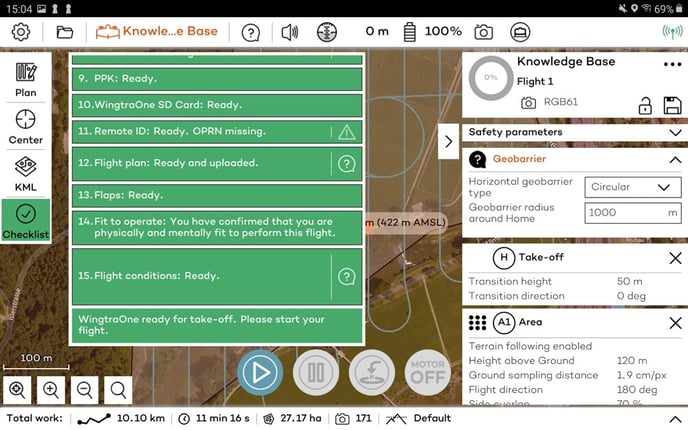
As the operator, you have to go through the pre-flight checklist within WingtraPilot before you can start the flight. Regarding the steps with the question mark icon, you can find help slides to guide you on how to use the drone. If any of the pre-flight checks fail (e.g., sensor failure), the respective pre-flight check turns red, so starting the flight is not possible. Below you will find an explanation for every checkpoint in the pre-flight checklist and troubleshooting advice if a check fails.
1. Ground clearance: The flight plan respects the minimum height above ground of 60 m and maximum height above ground of 200 m (excluding take-off and landing).
This point in the checklist is an automated test. It ensures the safety of the flight plan. As soon as you have added a home location and a flight area, the flight height will be automatically checked to guarantee the flight path is always between the minimum and maximum heights above ground. To modify the minimum and maximum height above ground parameters, check the safety parameters box on the right side. The ground clearance of the take-off and landing path will be checked upon flight plan upload, for a more detailed description, check out the flight planning tools.
Note: This pre-flight check is only available if elevation data is enabled. Check WingtraPilot settings to activate the use of elevation data.
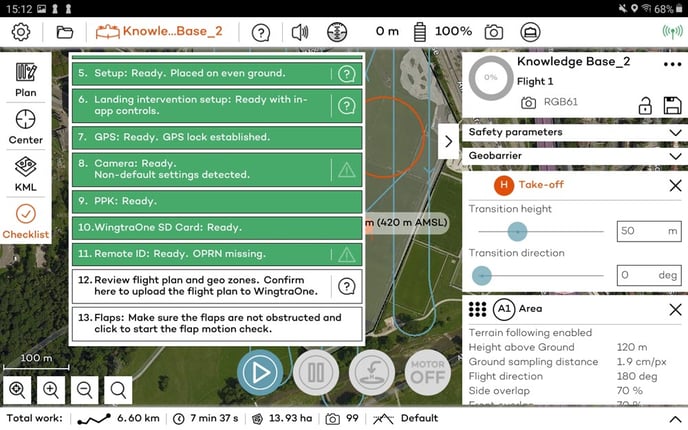
2. Hardware check. Is your distance sensor clean? Are your propellers intact and well attached? Is the camera lid removed?
Check if the distance sensor is dusty or is blocked by anything (snow, tape, etc.). The distance sensor is located at the tail of the WingtraOne, next to the middle stand. If it is not clean or if you are not sure if it is clean, take the time to clean it with a clean cloth.
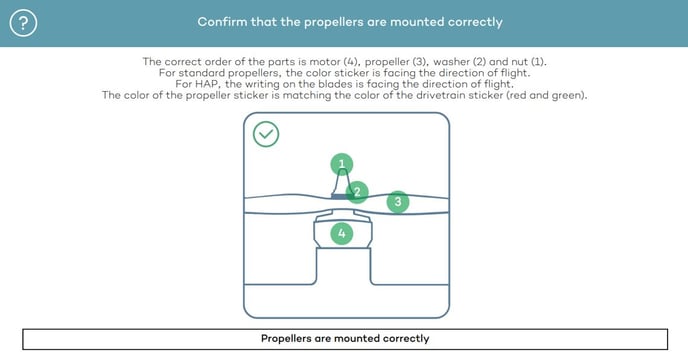
Visually check that propellers are not damaged and are well attached. Try by hand to unscrew the propeller: hold the motor with one hand and the propeller with the other hand and try to open it— the red propeller has a normal right-handed thread, the green propeller has a left-handed thread. If the propeller unscrews by hand, tighten the nut with the torx or hex-wrench tool as much as you can. See the maintenance chapter for how to replace a propeller if damaged.
In the picture below you can see the right order of the motor, propeller, washer and nut. In case of tipping, the window below will pop up, when clicking on the Hardware check, on the next flight after the incident.
Remove the camera protection lid. Put it in the pilot box right away, as it is easy to lose.
Confirm by clicking the checkpoint in the checklist. Do not fly if any part of WingtraOne is damaged.
3. Connect telemetry link to tablet and power on WingtraOne
This point in the checklist is an automated test. Connect the telemetry to the tablet to the right of the home button. WingtraPilot automatically connects to WingtraOne as soon as the telemetry is connected to the tablet and WingtraOne is powered on. If an automatic connection can not be established, you can manually connect in the Settings tab by clicking on the Telemetry button on the left side. On the bottom, click on Add. Select type Serial and baud rate 57600 and click OK. If you still cannot connect, restart and make sure that you have attached the telemetry and powered on WingtraOne.
4. Check battery voltage
This is an automated test. WingtraPilot checks whether the battery voltage is above 30V. If the voltage is below 30V, take-off is prevented and you have to switch batteries. In the following additional battery failure cases, WingtraOne will refuse take-off when trying to start the flight:
- Battery too hot (>40°C (>104°F))
- Battery too cold (<10°C (<50°F))
- Batteries are not charged evenly
5. Check even take-off position
This is an automated test. WingtraPilot checks whether WingtraOne is standing on even ground. Move WingtraOne if the check is red. If WingtraOne is level and the check stays red, restart WingtraOne. The maximal slope that is accepted is 10 degrees (17.6%).
In addition to an even take-off location, make sure that the terrain is not damp and muddy causing the middle stand or the drone to get stuck, which can cause it to tip while taking off.
6. Landing intervention setup: Ready with in-app controls
This is an automated check. WingtraOne can be controlled exclusively from the tablet with the in-app control buttons. If you've used the remote control in the past, the (recommended) option to disable it will pop up in this step of the checklist.
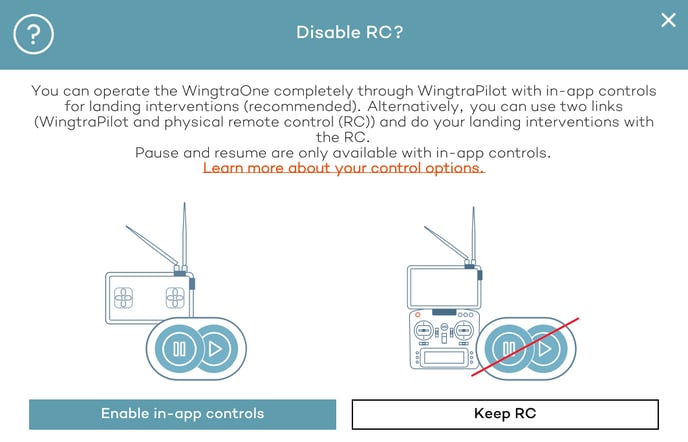
Flying using the RC is not recommended. However, in case you choose to use it, switch the RC on via the on/off button in the middle of the unit. Once it's switched on, it automatically connects to WingtraOne.
7. Check GPS signals
This is an automated test. Depending on the weather and the location, it can happen that your WingtraOne does not receive GPS lock for several minutes. If GPS lock cannot be established after more than five minutes, try to restart WingtraOne. If you still fail to get reception, submit a support request.
8. Camera readiness
This check will test the camera connectivity as well as the health of the camera mount and the ability of the SD card to store the image and flight data. The check is automatically performed immediately after plugging the flight batteries into WingtraOne. The checkpoint turns orange to indicate that the camera test process is ongoing. Once the test has successfully finished, the camera check box turns green.
If the check fails, click on the triangle with the exclamation mark to see more details about the issue and the potential solution. Once the problem is solved, click on the checklist item to repeat the check.

Specific to RX1 cameras
For RX1 cameras, the camera settings are also checked. In case the settings are different from the default and recommended values, the button displays a Non-default settings message. If you click on the triangle you will see the settings that are changed. Even with non-default camera settings, the pre-flight check turns green, and you can perform the flight.

The following settings are checked:
- Aperture: warning triggered if the value is not 4.5
- Light source: warning triggered if the white balance is not set to Auto
- Camera program mode: warning triggered if the mode dial is not on 2
- Metering mode: warning triggered if it is not set to multi-segment
- Mode dial: warning triggered if RAW+JPEG is selected
9. PPK connection
This check will test the PPK connectivity and starts configuring the device for data collection. It also starts automatically after the flight batteries are connected to the drone. If you do not have a PPK module installed or if the PPK license has not been activated, the button will turn green and a triangle with an exclamation mark will be displayed within the button. If you click on the icon a message is displayed that the PPK module is not connected.
If the check fails, the button will turn red and the reason for the failure will be displayed on the item. Click on the triangle with the exclamation mark to see more details about the issue and review troubleshooting instructions. Note that to repeat the PPK check you need to restart WingtraOne.
You can always bypass a failed PPK check by clicking on the troubleshooting window and selecting that you want to proceed without PPK. This will turn the button green, but incorrect or no PPK data will be collected.
10. WingtraOne SD card check
For WingtraOne GEN II drones this check will test that the WingtraOne SD card is inserted and ready. This is needed for the WingtraOne GEN II drones to fly.
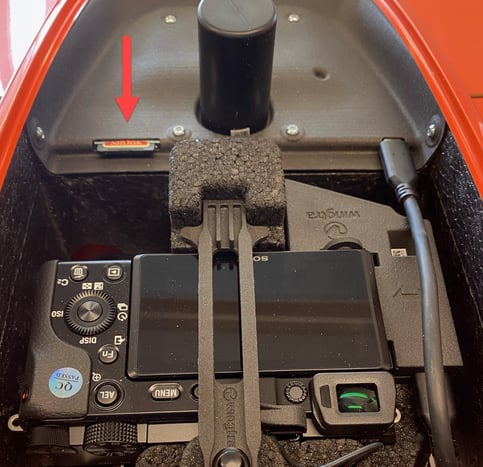
In case this check fails check the troubleshooting instructions in the Knowledge Base article.
11. Remote ID
As of software update 2.7, the remote ID readiness is a part of the pre-flight checklist.
For more information about the remote ID see the corresponding article.
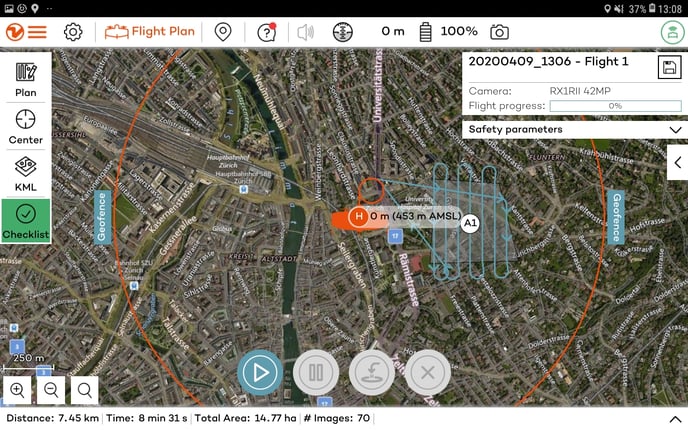
12. Review flight plan and upload to WingtraOne
After you have planned your flight, make sure you always review it by closing the checklist and checking the parameters and the planned flight path. Make sure WingtraOne will not collide with any obstacles. The altitude graph allows you to review flight altitudes properly. Note: having terrain data enabled (see Check 1) helps to set flight heights correctly. Be extra careful with the transition direction and height as well as the loiter circle height.
Click on this checkpoint in the pre-flight checklist to upload the flight plan to WingtraOne. WingtraPilot saves the flight plan automatically when you upload it by clicking on the checkpoint. In case you make any changes after uploading the flight plan, WingtraPilot will ask you to upload it again, which can be done by pressing the checkpoint again. If GPS position drifts more than two meters between flight plan upload and take-off, the check turns back to white and you have to upload again.
At the same time, further flight plan sanity checks are performed, and a warning is issued if they are not fulfilled:
- Infeasible flight plan: in case your first flight plan item after take-off or your last flight plan item before landing lies lower than transition height, your flight plan will be rejected
- WingtraPilot will give you the option to automatically insert a loiter waypoint at the respective location; it is recommended to insert the waypoint and manually adjust it (move it to a safe location and adjust the waypoint entry/exit altitude to a safe value)
- WingtraOne checks whether the camera SD card storage is too low to store the calculated number of images for the uploaded flight plan. If this is the case, clear more space on the SD card to make sure all images are saved. If you ignore the warning and continue the mission upload, be aware that you might miss some images towards the end of the mission
- Safe minimum height above ground checks if the ground clearance for take-off and landing is satisfied. You will be guided to select the height of the obstacles in the area and based on the selected option adapt the transition height to comply with the minimum height above ground or continue with your planned value.
- Geobarrier violation: the geobarrier is checked for compatibility with the defined mission. If required, you can increase the geobarrier parameter in the safety box on the right
- Confirmation that the propellers are mounted correctly: in case a propeller change is detected, a window with the instructions on how the propellers should be properly mounted will appear when uploading the flight plan
13. Make sure the flaps are not obstructed and click to start the flap motion check.
At this point, WingtraOne runs a routine (see video) that checks the functionality of both flaps and servos by moving the flaps back and forth.
Starting from version 1.13, instead of you confirming the flap motion integrity visually, the WingtraOne performs a self-diagnostic check that's designed to detect a range of different potential damage cases to the flaps and servos.
After the flaps routine is completed, the checkpoint will turn green if no issue has been detected. If an issue is detected, the check will fail (red checkpoint). You can repeat the test once more in case of failure, by pressing the flap check button in WingtraPilot.
DO NOT FLY if the check fails twice; instead, contact Wingtra Support.
- Make sure the flap is free from obstacles, whenever the drone is turned on
- Prevent taking off from dense high grass or bushes if possible
- Do not leave the drone turned on for long periods of time if not needed
-
14. Check that there are no people within five meters around the drone and that the environmental conditions and airspace are suitable to fly
Check if the environmental conditions are suitable to fly. Also check that your flight does not violate laws. Make sure no people are close to WingtraOne. In case of wind, we advise you to be more than five meters away from WingtraOne during take-off and landing. Furthermore, be aware that GPS is less accurate in the case of surrounding tall objects (e.g., buildings, trees). This can lead to drift of WingtraOne and an inaccurate landing. Therefore, keep more distance from tall objects. Confirm by pressing this checkpoint in the checklist.
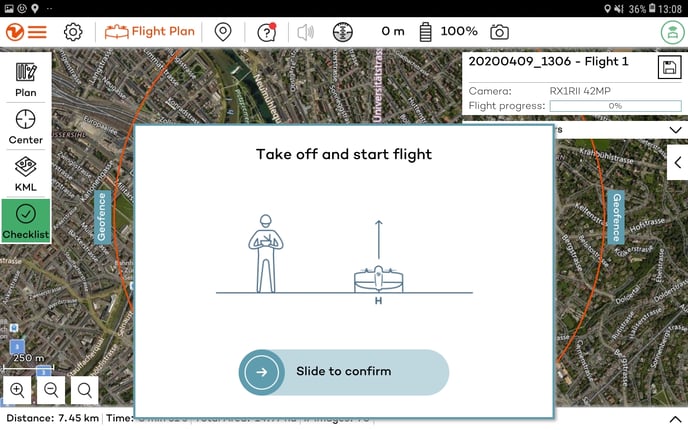
15. Complete all previous steps and fly WingtraOne
To start the flight, click on Start flight and move the slider left to right as shown in the images below. The ready-to-fly button will turn solid green once WingtraOne starts flying.
Motor pre-flight check
Before starting the flight, there is an automatic check that spins the motors separately (see video below) to ensure that both of them function properly and that they both draw the same amount of current. In case this check fails, the take-off will be disabled. In such a case, check our list of errors for instructions on how to respond.