If you have a WingtraOne with a PPK module, high-precision PPK processing will yield centimeter-level accuracy geotags for your flight images. If you do not have a PPK module on your WingtraOne, please read the Non-PPK geotagging article.
For every flight mission, a folder with the project's name is created on the SD card in the "WingtraPilotProjects" folder. Both the collected images and GNSS data of the corresponding flight are saved in this project folder. You can geotag the collected images in the office after completing multiple flights throughout the day.
Note: You can only apply PPK geotagging to WingtraOne data with WingtraHub software. Check out the Install WingtraHub - PPK processing toolchain for information about how to install and set up WingtraHub correctly.
The PPK geotagging process is similar to the non-PPK geotagging process, but with some extra data needed from the user's side. You'll take the SD card out of the camera after the flight(s), put it into the computer, copy the data to your computer, preferably an SSD drive, and start the geotagging procedure as follows.
Geotagging the images from the SD card can be slow, so we recommend copying the data to an SSD drive before starting the processing.
- Open WingtraHub software on your computer and select the "Geotagging" tab.

2. In case you need guidance on the process, click on the Help menu. There, you can find more explanations regarding the base location, and you can directly visit the knowledge base or open a support ticket.
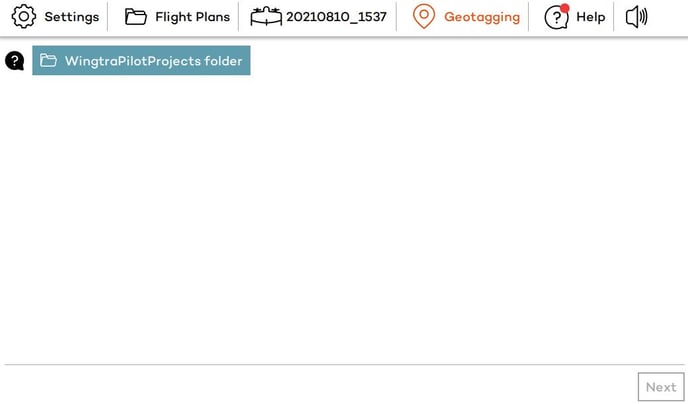
3. Under the "Geotagging" tab in WingtraHub, select the "WingtraPilotProjects" folder on your SD card or the copied folder from your hard drive.
Make sure to select the folder that holds all projects, not a single project folder by itself.
4. Projects with PPK enabled are labeled with "PPK" on the bottom right corner of the project boxes.
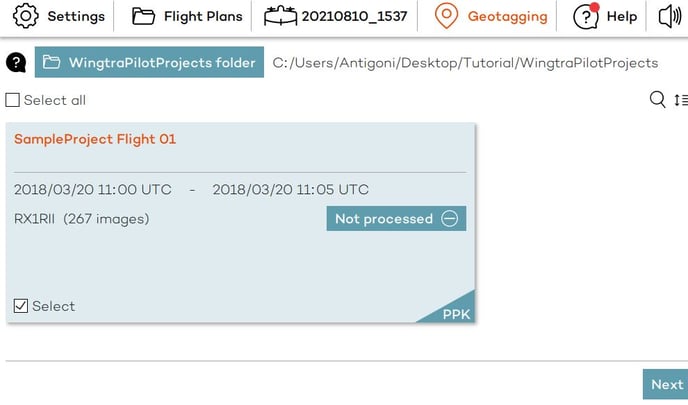
5. Select the project(s) that you would like to geotag, then click "Next." You can then define order, sort or search for specific projects.
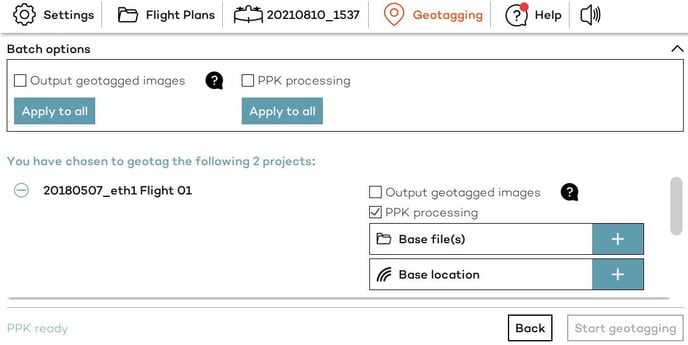
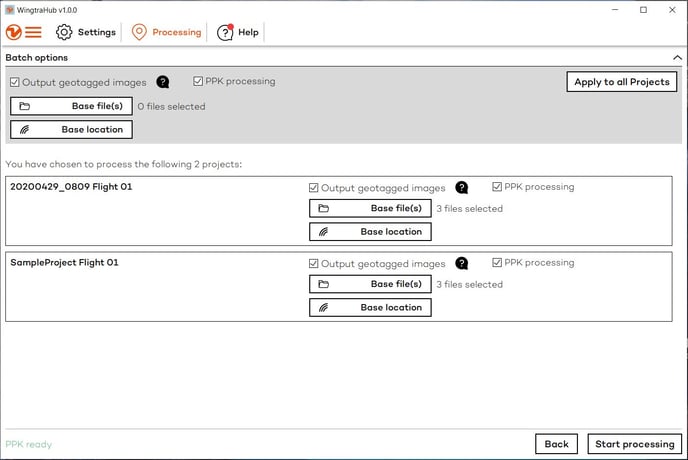
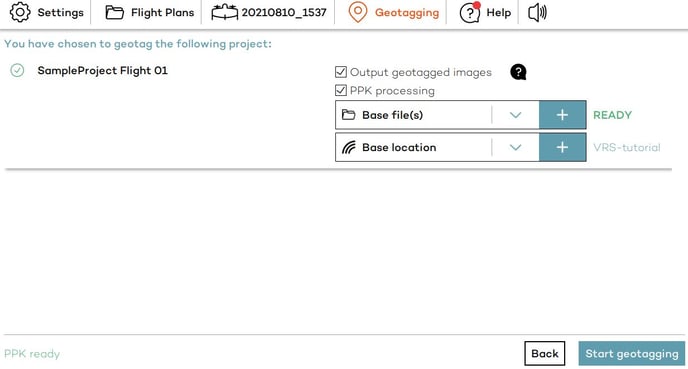
6. Define processing details for all projects using the batch options on top of the screen, or you can adjust the settings for every flight individually. When using the batch options, you can still change the settings for specific projects after choosing "Apply to all Projects."
7. Begin the PPK processing:
- Make sure the "PPK processing" checkbox is selected to enable PPK geotagging. Check that the grey PPK dongle is inserted and that the "PPK ready" sign shows up in the bottom left.
- To save processing time and storage space, and if your photogrammetry software allows the import of .csv files, deselect the option "Output geotagged images." When this option is enabled, images will be duplicated into the OUTPUT folder and will have embedded geolocation and orientation information. By unticking the box for this option, only a *.csv file containing all image coordinates with their accuracy and all the orientation parameters is created. When possible, we recommend using .csv to import the geotags into your photogrammetry software to save processing time in WingtraHub and storage space. However, some post-processing software, such as DroneDeploy, does not allow the import of .csv files and you need to use the tagged images.
- Select the "Base file(s)" as reference(s) for PPK processing by clicking on the + icon. Please check out the PPK base station article to learn about the different base station options.
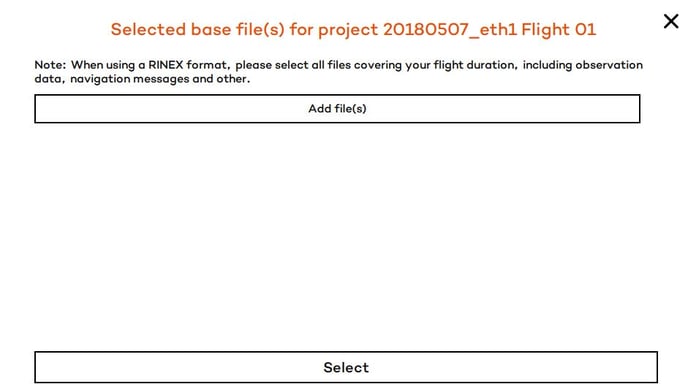
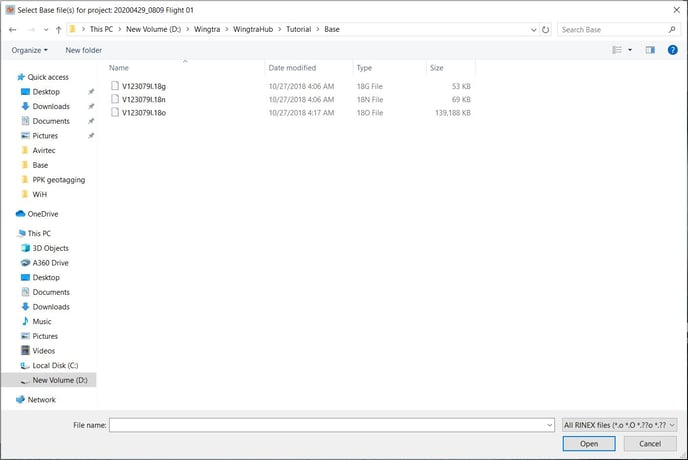
- Make sure to select all available RINEX files.
- The RINEX files are parsed immediately after they are imported to provide feedback on potential issues during processing. The RINEX version, the time overlap, the baseline and the antenna type, position and offset are checked. Warning and error messages notify you in the following cases: the time overlap is not sufficient, the base is not close enough to the flight location, the antenna type is not detected or the RINEX version is not supported. If no issues are detected, the file will be ready for processing. Click on the arrow to expand the list with the RINEX information and see potential errors or warnings.
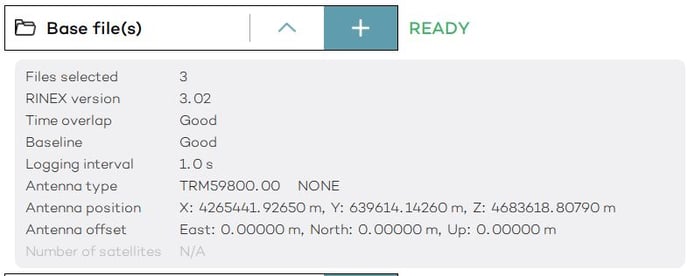
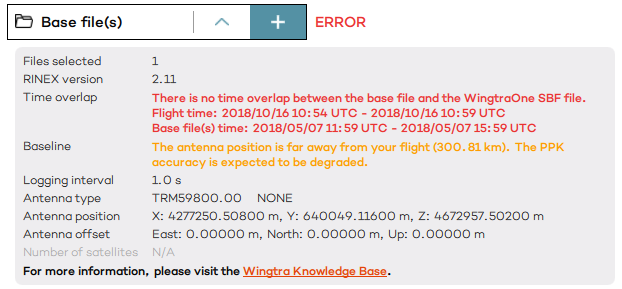
Error messages in this phase of the RINEX files pre-processing will not allow to proceed with the geotagging. Warning messages inform you about issues that might influence the accuracy of the outputs, but they do not block the image geotagging.
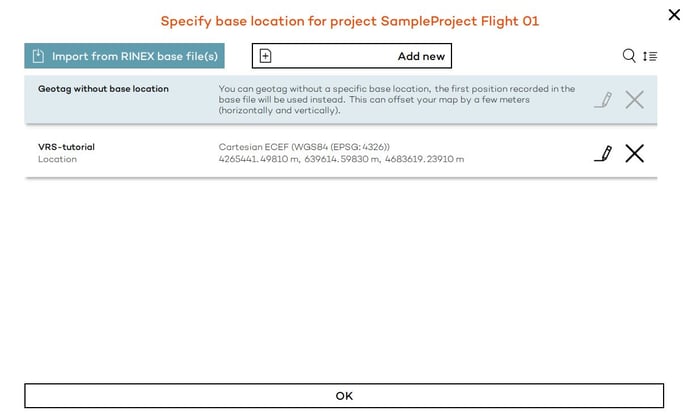
- Define the base location. Click on the + icon next to "Base location" and then on "Add new" to manually import the base location for this project. Manually importing the coordinates of the base is usually the most accurate option if the coordinates have been measured with a high-accuracy method.
Alternatively, import the base location from the header of the RINEX file, by clicking on the "Import from RINEX base files(s)" and select the imported base location. In case no base location is specified, the first position defined in the base file is used.
The base location batch option doesn't offer the "Import from RINEX base files(s)" functionality.
A workaround is to let the pre-process of the first project end, create a new base location from the RINEX, and then choose that base location in the batch option.
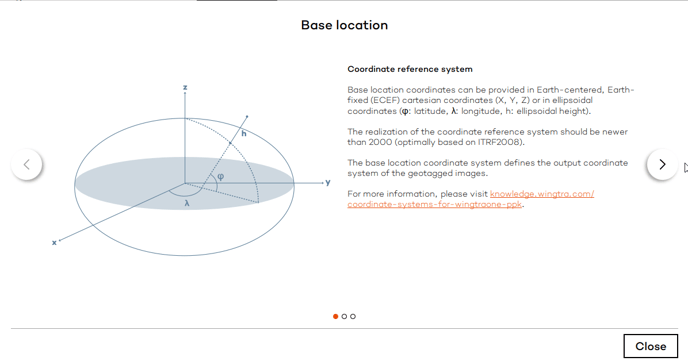
- In case you manually import the base location, add a location with high-precision coordinates and give it a descriptive name (it's best to include the coordinate system used). WingtraHub will remember your base locations. Wingtra recommends using WGS84 with ellipsoidal height as the coordinate system for your base location. For more information on the coordinate system requirements, please see the Coordinate systems for WingtraOne PPK article. Once the coordinates are entered, press "Save" and select the newly-created base location in the base location selector.
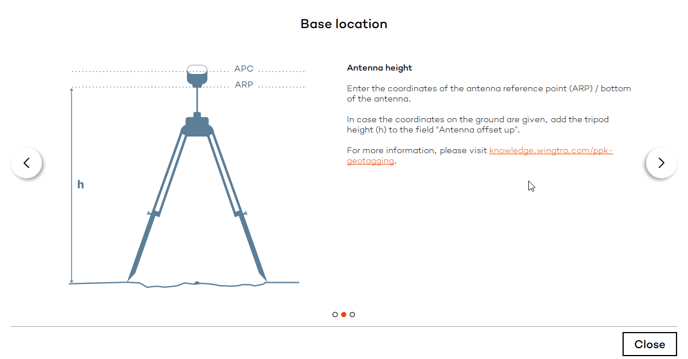
If you use your own base station, enter the coordinates of the antenna reference point (ARP) of the GNSS receiver. If you get a warning that the antenna type cannot be detected from the RINEX file, add the offset from the reference point to phase center (ARP - APC) to the field via "ARP-APC offset".
In case the coordinates of a known point on the ground are given, add the height of the tripod (ground to ARP) to the field via "Antenna offset up."
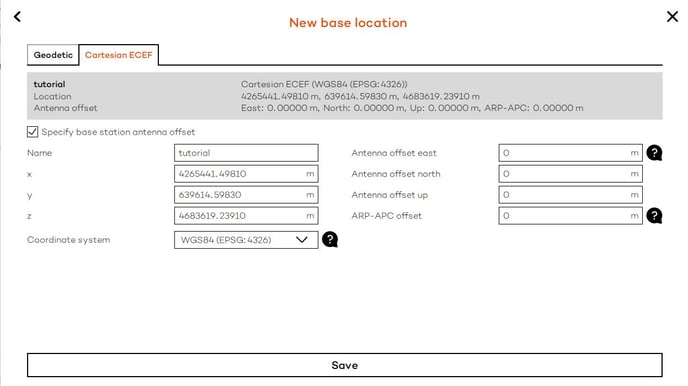
- Click on the question mark icons on the New base location window to access the help slides with further explanations on the coordinate systems, the antenna height and type of base location.
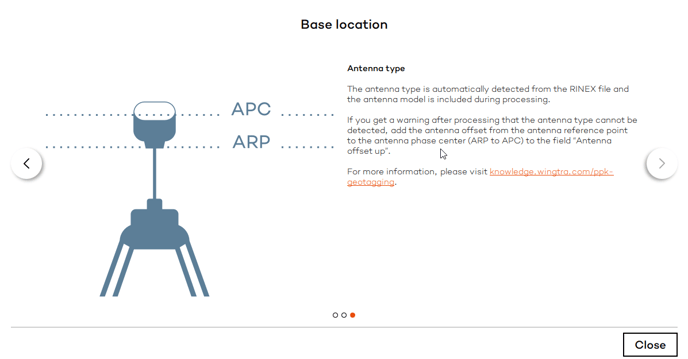
When creating the base location using the RINEX file, WingtraHub should suggest antennae offset values based on information included in the RINEX header. If antenna offset and ARP-APC are not listed, they may have to be manually entered as the Base location for the project. Please ensure that the antenna offset fields match for the Base files & Base location prior to beginning the geotagging process.
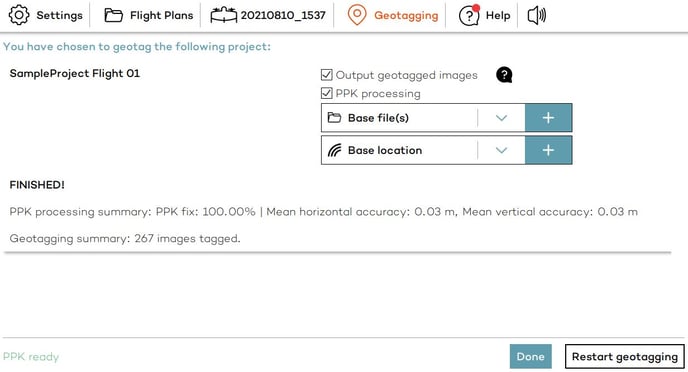
7. After setting all the options, click "Start geotagging" in the bottom right corner and observe the processing steps. For batch processing of several projects, WingtraHub will automatically process one project after another.
8. Have a look at your results. WingtraHub will display the PPK fix percentage and the horizontal and vertical accuracies in meters for each project individually. To access the full output, navigate to /WingtraPilotProjects/SampleProject Flight 01/OUTPUT and inspect the geotag PDF report, the geotags.csv file and the geotagged images. Use the images and .csv for processing in Pix4D, Agisoft Photoscan, or the like.
We recommend you go through the PPK tutorial to learn more about the details of the PPK geotagging process.
Results of Geotagging
After geotagging, you get accurate geolocation information for each flight image. It is provided in a .csv file in the OUTPUT folder of your project, and if selected in the EXIF metadata of your images.
Here is an overview of the final content of the project folder inside the "WingtraPilotProjects" folder:
- /DATA subfolder: all GNSS data available for this particular project
- /IMAGES subfolder: all unmodified images for this particular project
- /OUTPUT subfolder: all output data from the geotagging process
- /DATA/date_time.json file: a text file containing time, GNSS coordinates and attitudes for all images (for non-PPK geotagging)
- /DATA/date_time.sbf file: a binary file containing the GNSS information of the mission for PPK geotagging purposes
- /OUTPUT/imagename.jpg files: tagged images with GNSS coordinates and exact GPS time embedded as EXIF tags
- /OUTPUT/projectname.csv file: a geotags text file that contains the relevant meta-information for all flight images as follows.
- If Pix4D type .csv file output is selected:
- image name, latitude [decimal degrees], longitude [decimal degrees], altitude [meter], omega [°], phi [°], kappa [°], accuracy horz [meter], accuracy vert [meter]
- If Agisoft type .csv file output is selected:
- If Pix4D type .csv file output is selected:
-
-
- label, longitude [decimal degrees], latitude [decimal degrees], altitude [meter], yaw [°], pitch [°], roll [°], accuracy horz [meter], accuracy vert [meter]
-
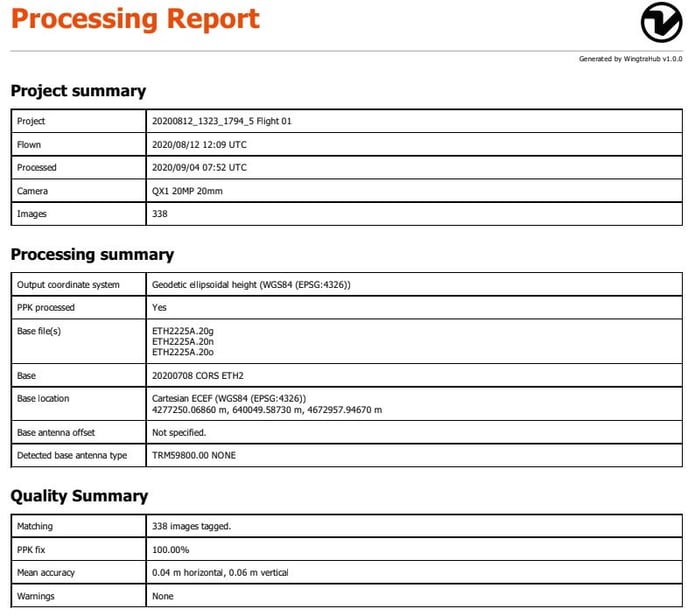
- /OUTPUT/geotagging.pdf file: a report that contains all the information regarding the geotagging process
The processing report is divided in three sections.
- Project summary gives you basic information about the project that was processed. This information includes the project name, date and time of both flying and processing, as well as the number of images.
- Processing summary contains information about input data used for processing. Here, you can see which base data was used, the coordinates of the base station, and information about the base station antenna.
- Quality Summary shows you the most important parameters of the processing:
- Matching shows you the number of images that were geotagged
- PPK fix indicates the percentage of images that were tagged using a fixed PPK solution
- Mean accuracy is the average accuracy of projection center coordinates of all geotagged images
- Warnings indicate an issue or bad results during or after the processing
For a more deep insight into possible errors and warnings in WingtraHub check out the article dedicated to this subject.
To learn more about how to use output data from the geotagging process, please refer to the Image post-processing software article.