- Site Setup
- Processing AeroPoints
- Upload and submit WingtraOne PPK data
- Alternative workflow with WingtraHub
- Who should you go to with questions about using your WingtraOne drone with Propeller?
Ensure that all of the equipment is registered in both Wingtra and Propeller. Before your first flight make sure your PPK drone is registered with Wingtra, download the Aeropoints mobile application, set up a propeller portal account, register the Wingtra SN in Propeller, activate the Aeropoints, and purchase the PPK Propeller subscription if applicable.
Check out the Propeller Knowledge Base for more information.
When using a WingtraOne there are some considerations you may want to consider to produce as accurate of a model as possible. For local coordinate systems, you MUST set up an Aeropoint V2 or local base over a known point.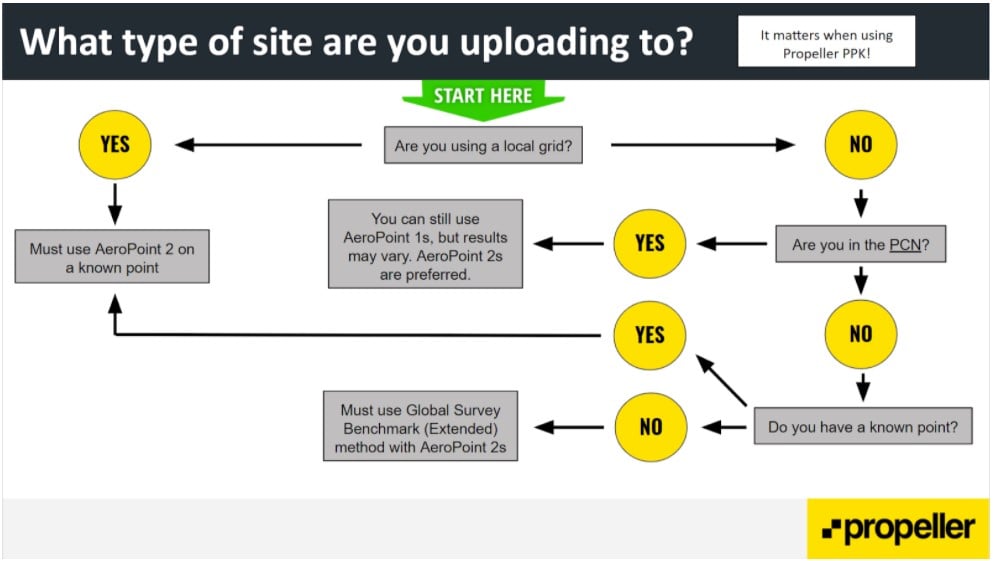
Project Set up
- In the "Home" tab, click on "Create New Site"
- Give it a Name and select the industry.
-2.png?width=688&name=image%20(0)-2.png)
- Locate your site
-3.png?width=688&name=image%20(1)-3.png)
- Select a published coordinate system or a local grid system. To provide the local grid parameters, you can drag and drop the site setup file into Propeller. Often that file is a Trimble .JXL (JobXML) or a Topcon GC3 file. Learn how to set up a local grid with your Trimble equipment.
-2.png?width=688&name=image%20(2)-2.png)
- Check out the calibration details.
-2.png?width=688&name=image%20(3)-2.png)
- To verify the transformation between global coordinates and the local grid system, you can enter a test point. This step is optional.
-1.png?width=688&name=image%20(4)-1.png)
- Add people you want to give access to your new site.
-2.png?width=688&name=image%20(5)-2.png)
- Your site has been created and you can start uploading data.
-1.png?width=688&name=image%20(6)-1.png)
(optional) Processing AeroPoints to check they are accurate
- Select the AeroPoints which you want to process.
-1.png?width=688&name=image%20(0)-1.png)
- Select an AeroPoint and specify its coordinates, it will be used as a base station to process the other AeroPoints. If you used a different base you need to select the RINEX upload selection then enter the base location coordinates.
-2.png?width=688&name=image%20(1)-2.png)
- Check the location of the AeroPoints
-1.png?width=688&name=image%20(2)-1.png)
- Check out the quality of the processed AeroPoints
-1.png?width=688&name=image%20(3)-1.png)
- Make a copy of your AeroPoint survey - you need an unprocessed AeroPoint survey for PPK processing

- More details about Processing AeroPoints can be found on the propeller knowledge base.
Upload and submit WingtraOne PPK data (direct PPK processing in Propeller Aero)
Validation
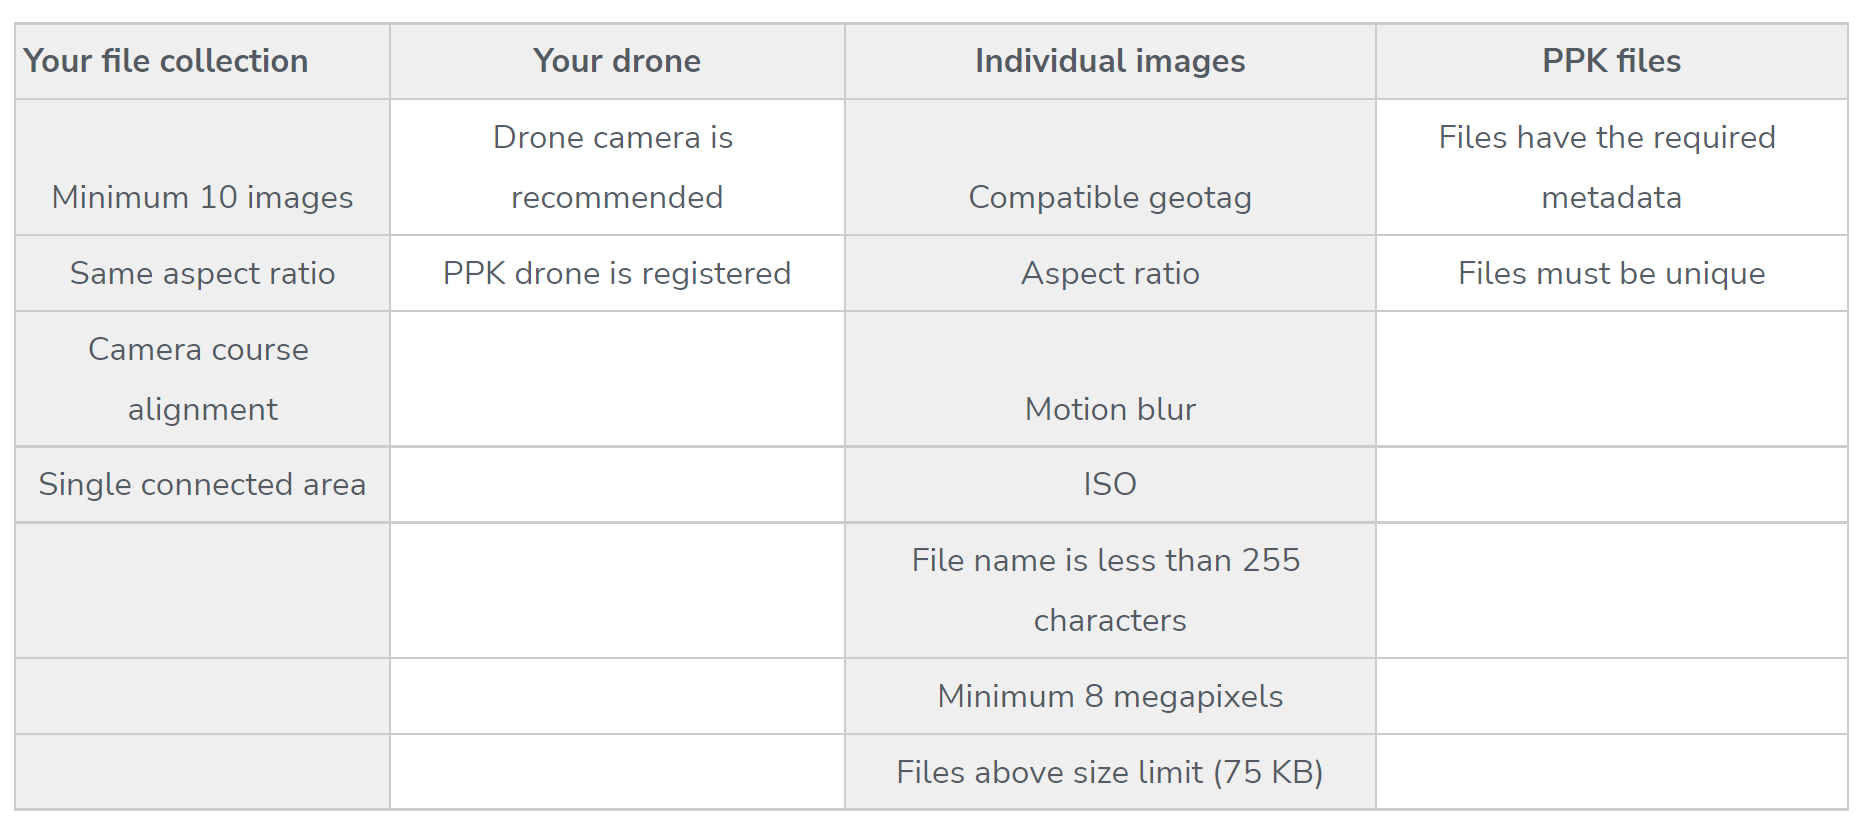
Your photos are scanned and validated in the following four categories. Photos must pass these requirements to be properly processed.
- Click on Data Processing > Create a new dataset
- Select the previously created site and specify what type of data you are submitting
.png?width=688&name=image%20(0).png)
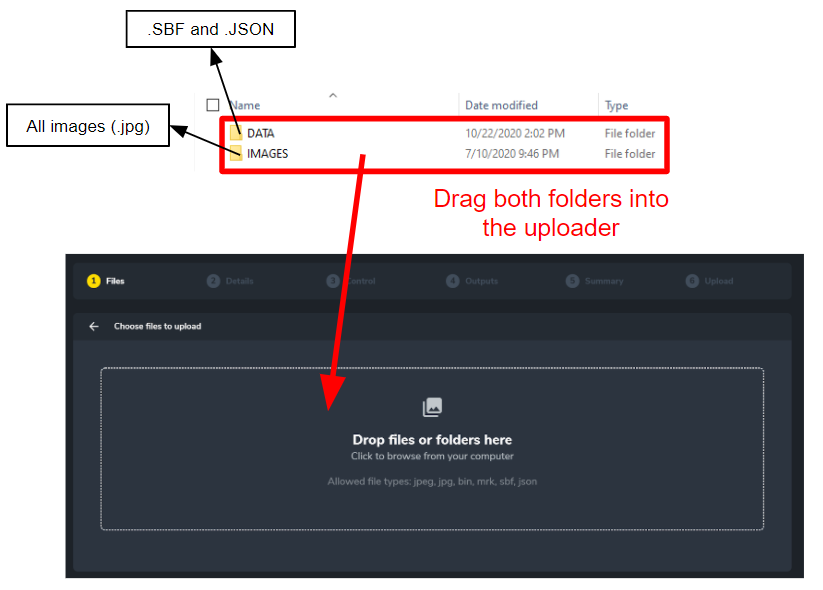
- Drag in the DATA and IMAGES folder directly from the camera SD card.
- DATA folder
- FlightName WingtraOne.sbf
- Flight Name.json
- IMAGES folder
- FlightName 0000XXX.JPG
-1.png?width=688&name=image%20(1)-1.png)
- DATA folder
- Check that the files pass all automated checks.
.png?width=688&name=image%20(2).png)
- Enter the details of the dataset.
.png?width=688&name=image%20(3).png)
- Select the previously uploaded unprocessed AeroPoints as GCPs and check that the coordinate system is correct.
.png?width=688&name=image%20(4).png)
- Select an AeroPoint that will be used as a base station to process the other AeroPoints and the image geotags. If you have a local base station you can use the RINEX upload option then specify the base coordinates.
-1.png?width=688&name=image%20(5)-1.png)
- Specify if the AeroPoints should be used as Ground control point, Checkpoint or if they should be excluded. Recommendations on how many GCP/CP should be included can be found here.
.png?width=688&name=image%20(6).png)
- Add a comment about your GCPs.
.png?width=688&height=388&name=image%20(7).png)
- Configure the deliverables you wish to be created.
.png?width=655&name=image%20(8).png)
- Verify that all the information in the settings is correct.
-1.png?width=688&name=image%20(9)-1.png)
Alternative workflow with WingtraHub
Instead of doing the PPK geotagging directly in the Propeller Aero cloud, you can also download the RINEX data from your Aeropoint (requires an Aeropoint version 2) and geotag the data in WingtraHub. Please watch the following video that runs you through the process.
If you have already geotagged in WingtraHub, additional files will be created and placed in the DATA folder. Please do NOT include these additional files when uploading using Propeller PPK. The only two files from the DATA folder that should be uploaded with your images are FlightName WingtraOne.SBF and FlightName.JSON.
In most cases, if you are using the WingtraOne PPK drone with Propeller AeroPoints, you do not need to use WingtraHub to geotag your images before uploading. You could simply proceed with Propeller’s PPK workflow.
However, there are some situations where you would use WingtraHub, including:
- You do not use AeroPoints.
- You have your own base station.
- You only have AeroPoint 1s and you are not within the Propeller Corrections Network (PCN).
- You only have AeroPoint 1s and are on a local grid site.
- Please talk to your assigned customer success engineer or Wingtra Support about any other situations.
I still can’t do it!
For AeroPoint issues, please contact the Propeller hardware support team by emailing hardwaresupport@propelleraero.com.au.
For WingtraOne questions, please contact Wingtra Support at support@wingtra.com.