| TABLE OF CONTENTS |
|
Step 1. Setting up your project Step 2. Configuring the processing options |
Processing prerequisites
The processing workflow described in this article works for the latest version of the Pix4Dfields software, v1.12, which has introduced both accurate geo-processing for high-resolution digital surface models and support for the RedEdge Panchromatic (RE-P) sensor. For more information on processing requirements, please visit the Pix4Dfields support page.
Step 1. Setting up your project
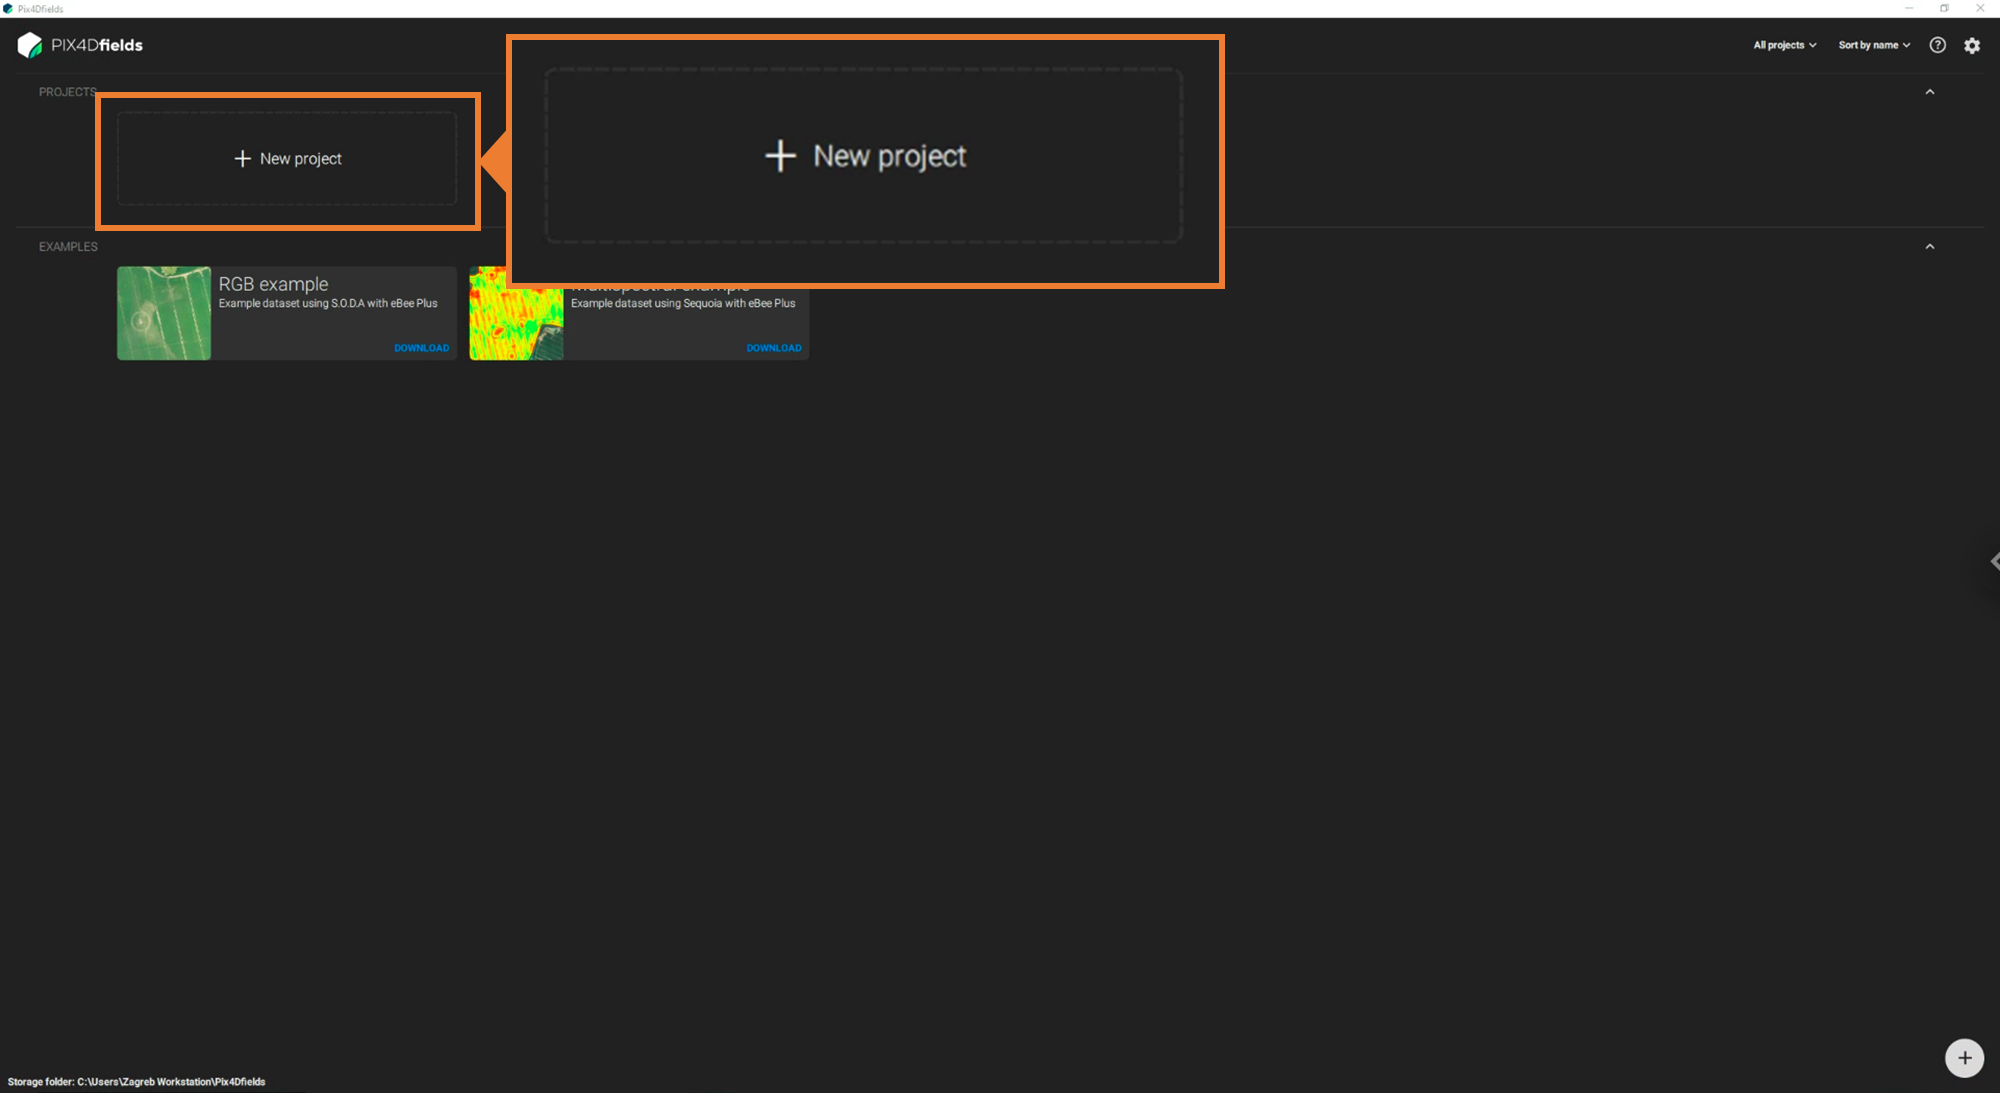
To set up your project, open Pix4Dfields and select New project. This button is highlighted in the image.
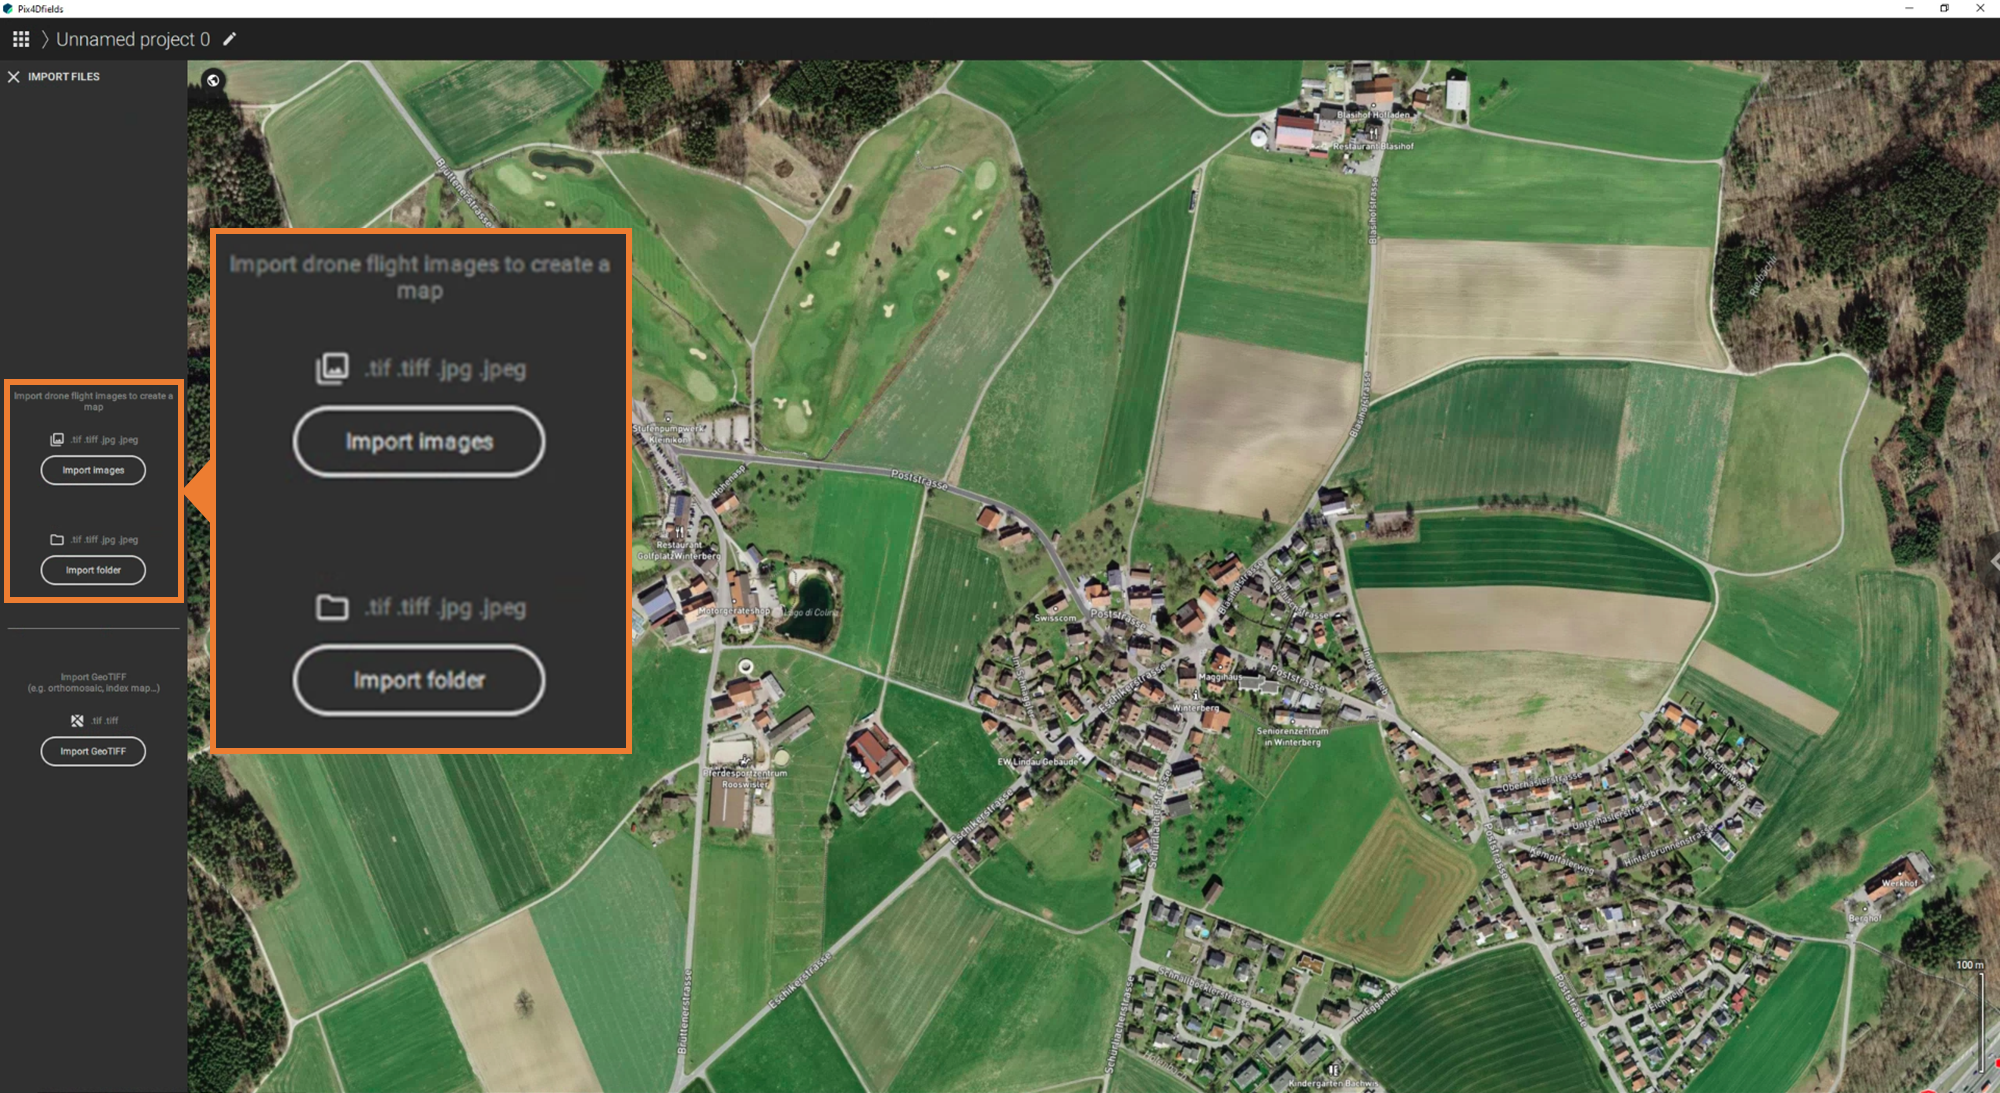
Upon creating a new project, Pix4Dfields will take you to a map screen where you can continue the project setup. Here, you can import the images that you need for the processing. The software gives you the option to either Import images or Import folder.
💡 Tip: The import process will be easier if all the images are moved to a single directory. This is especially relevant for larger projects that may have images in multiple folders.
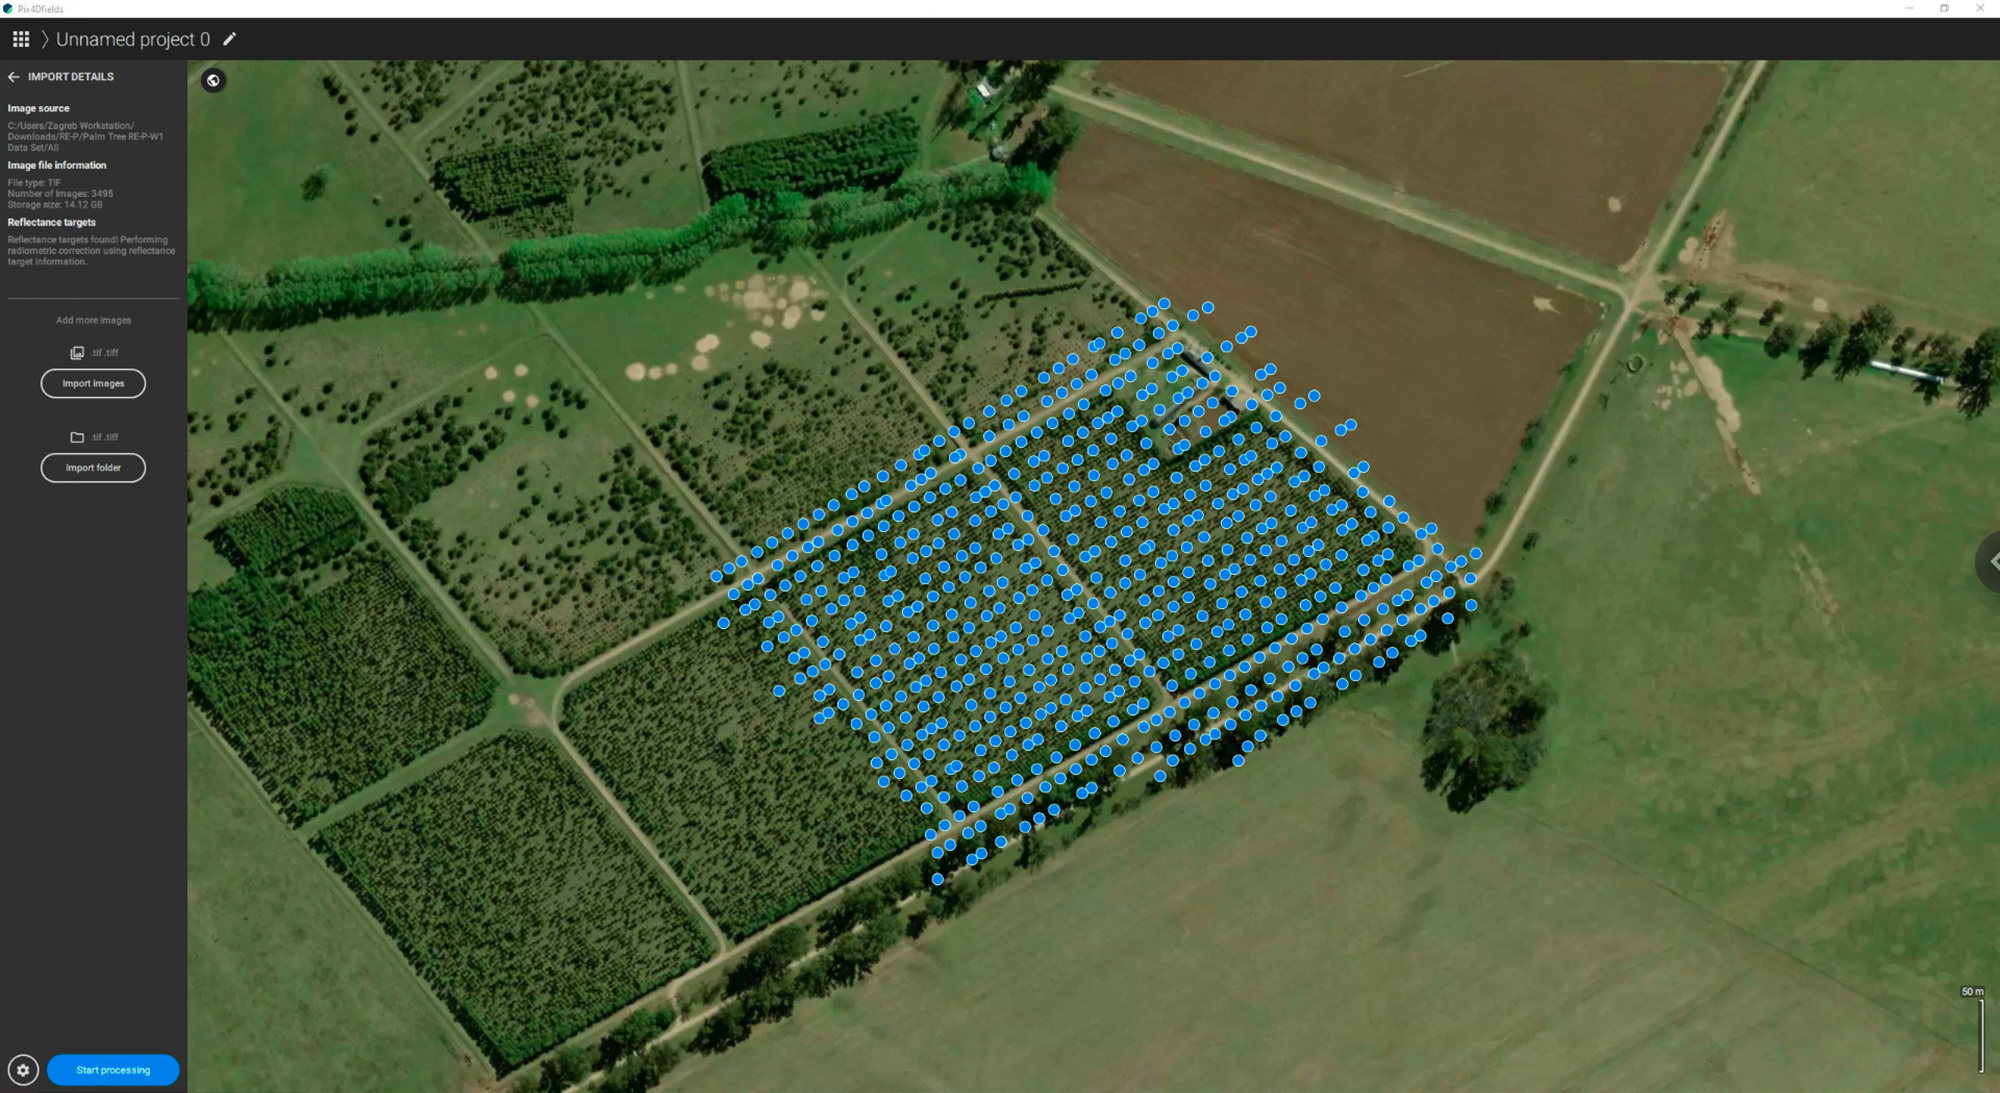
After importing the images, please take the time to verify whether your project is accurately represented by looking at the map. All image triggers will be displayed by the software similar to what is shown in the image below.
Step 2. Configuring the processing options
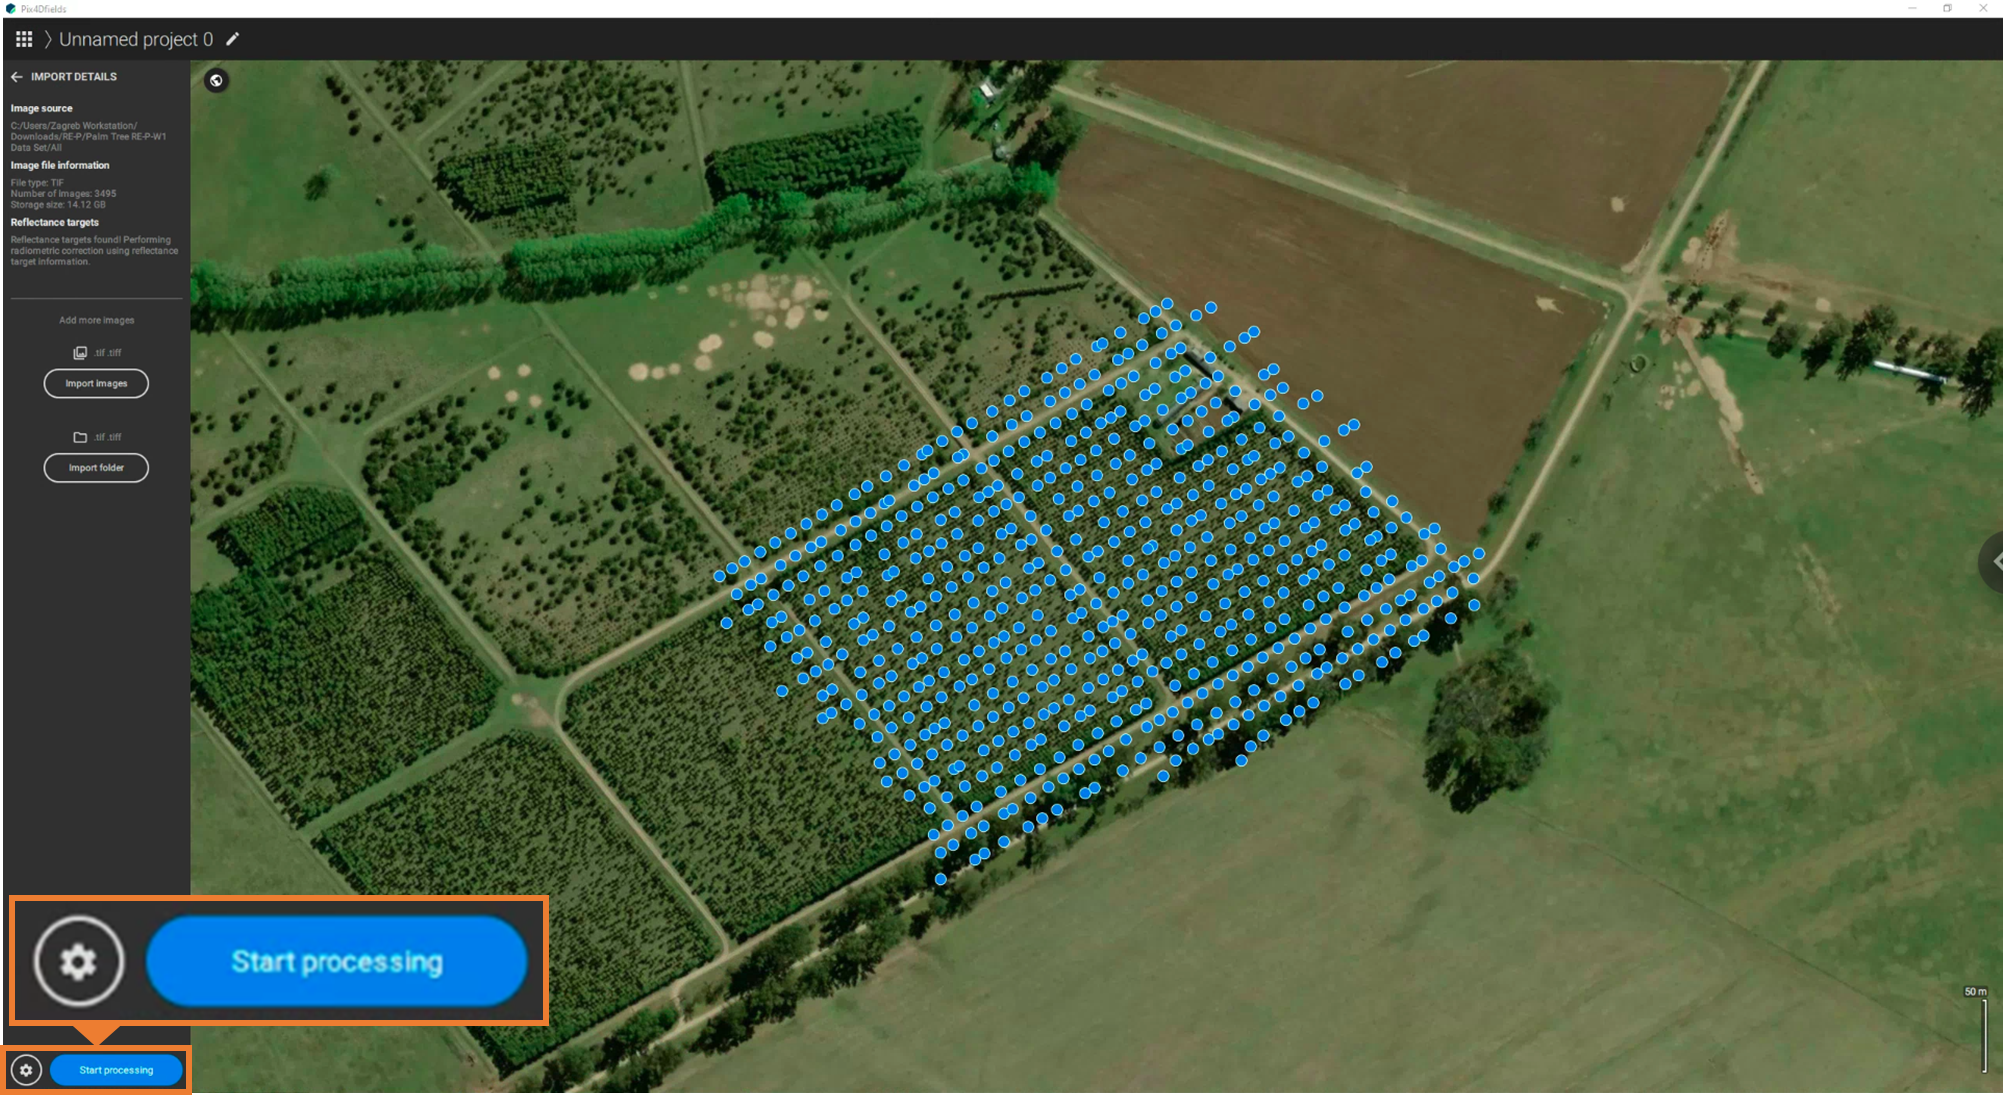
With the images added in, the next step is to initiate the processing. Before you do this, however, let's take a quick look at the various general and advanced processing options. These can be accessed by clicking the gear icon at the bottom-left of the screen.
This will open up the prompt below, which highlights the general options that you can configure for the processing. Three notable settings are indicated and discussed below:
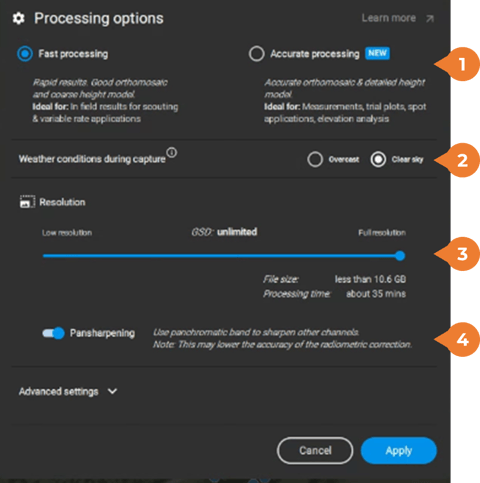
- Choose processing speed: Fast processing or Accurate processing. The former is sufficient if you only need to generate reflectance maps or vegetation indices from the RE-P data. This choice is significantly faster than accurate processing, which doesn't differ greatly in the overall quality of the orthomsaic. However, accurate processing generates a more detailed and accurate height model. With the increased resolution afforded by the panchromatic band, this can be useful for creating bare-earth maps of a field early in the season.
- Weather conditions. The application allows the user to specify the ambient conditions during the data collection. If you note that your data was captured under an overcast sky, Pix4Dfields will be more sensitive to the effects of cloud cover on your images during the stitching process.
- Resolution. Some users have size considerations or more lenient GSD requirements. This part allows you to set up the GSD based on your resolution needs.
- Pansharpening. For the RedEdge-P sensor, this item has to be toggled. It will tell the software that the data needs to automatically be pansharpened after processing.
💡 Tip: Given the impact of weather on the processing options, it is good practice for pilots to take note of the sky conditions while in the field and pass this on to the data processing team. If no such information is available, you can also quickly skim through the images by increasing the thumbnail size on the folder view.
Beyond general processing configurations, it is also beneficial to understand the advanced settings available. Three notable settings are indicated and discussed below:

- Image blending. In certain cases, the resulting multispectral orthomosaic can have color balancing issues due to either ambient conditions or the quality of the data capture. If you are mixing data across flights that have a substantial time gap, this can also occur. Typically, this cannot be diagnosed prior to processing. One only recognizes this during the quality assessment of the finished products. As such, it is recommended to keep this unselected unless you expect some color balancing problems to come up. Note that having this on will slow down the processing.
- Radiometric correction. This should be kept on at all times as radiometric correction is imperative to having reflectance maps that you can accurately compare across different time intervals. Pix4Dfields automatically detects the images of the calibration panel that you captured prior to the flight and considers this as well as data from the DLS attached to the sensor during the radiometric correction. For more information, you can consult this article.
- GPU acceleration. If your workstation has a GPU, make sure that this is toggled so that you can take advantage of faster processing times.
After finalizing all the settings, you can now kick off your project's processing by clicking on the blue Start processing button beside the gear icon, pictured in the image above for reference.
Step 3. Understanding the processing outputs
Once the processing is finished, you will immediately see the final stitched orthomosaic generated from your data. Apart from this, the processing also generates a surface model. These two product options are listed on the left pane of the window, as shown below.
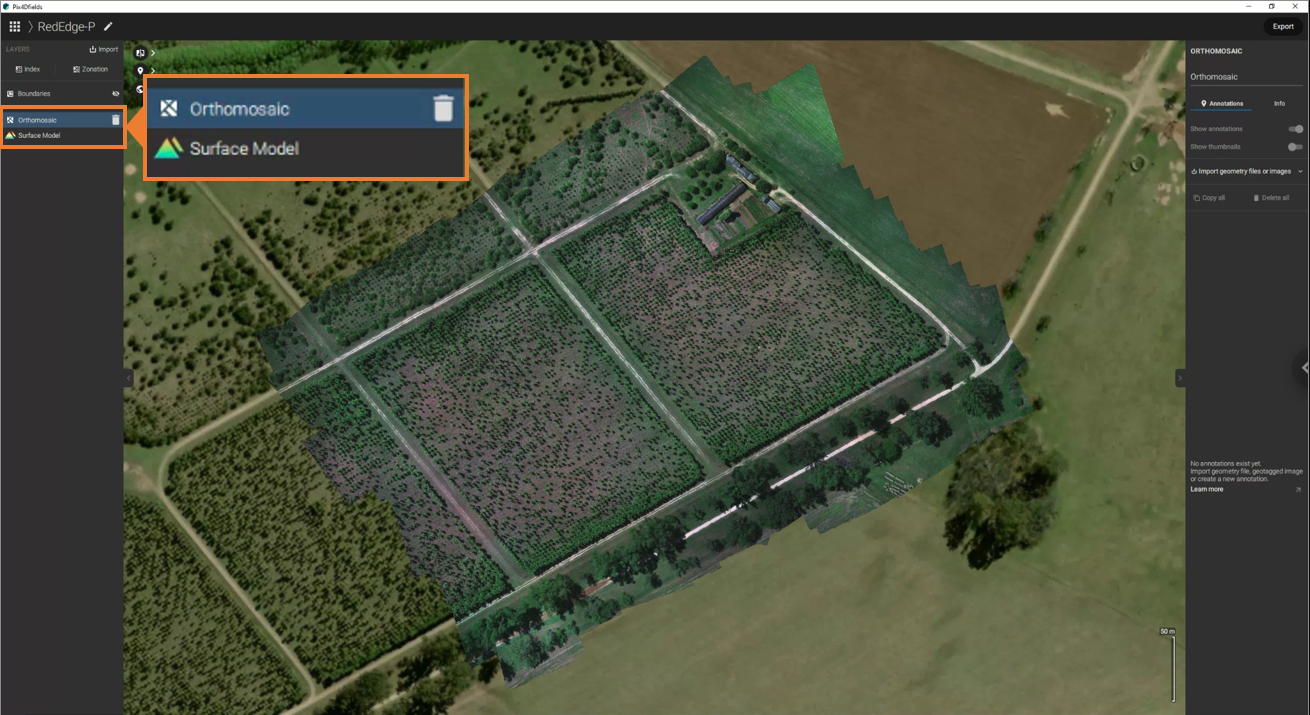
The orthomosaic generated in the processing will have six bands. The bands are going to be stacked in this order: blue, green, panchromatic, red, red edge, and near-infrared. This orthomosaic is already pansharpened.
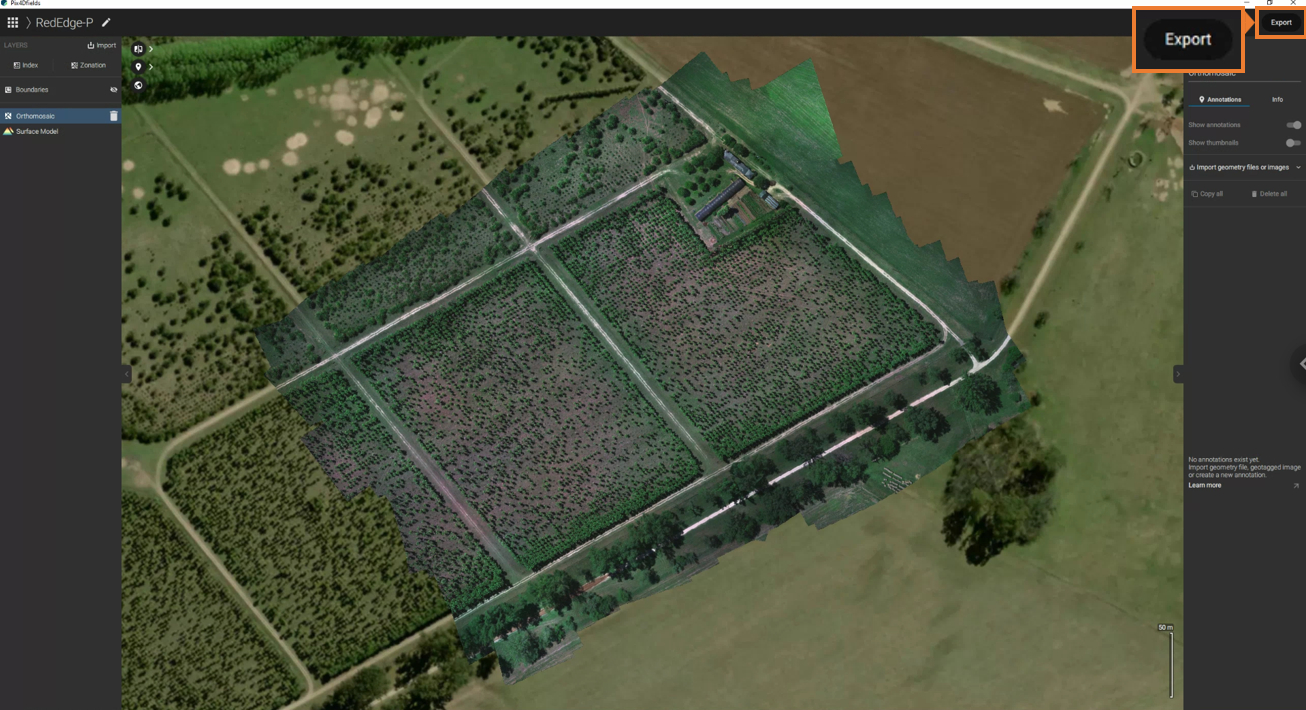
Step 4. Exporting the orthomosaic
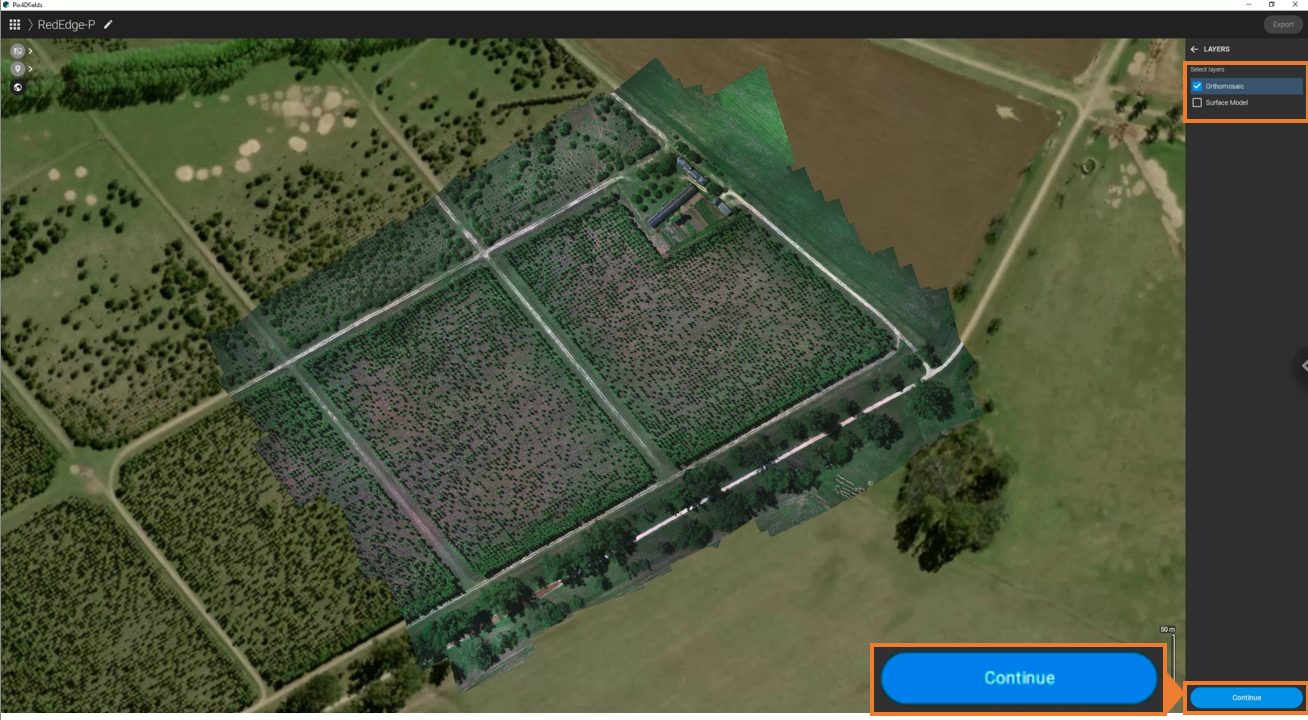
To do this, click Export on the upper-right of the window. Then, select Orthomosaic as this is what you want to export. Once done, click on Continue. These steps are shown below.
Upon clicking on Continue, a prompt will pop up with various export options that you need to set. Each of these is discussed below:
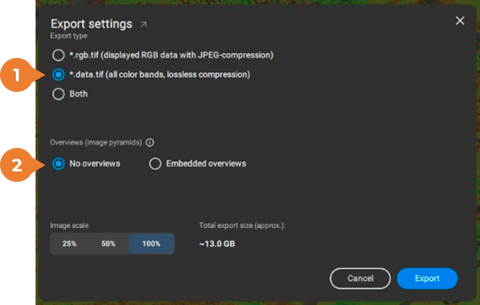
- Export type. Here you have three options. The first is to render the orthomosaic as an RGB raster thus preserving the way it is currently visualized in the software. The second option export the orthomosaic as is, keeping the reflectance data in the raster. The third option saves both rendered and preserved data. The second option is the recommended one.
- Overviews. The second export setting gives the user the option to save the overviews of each of the layers. Having the overviews already saved can save time when opening these files. However, since you may still need to do further processing on the orthomosaic, the option of No overviews is recommended.
💡 Tip: In the export settings prompt, you will see the amount of disk space that the files will take up. It is recommended that you verify that you have more than the required export size to avoid any issues at this step.
Now that the settings are finalized, just click on the Export button in the prompt above. Pix4Dfields will then ask you where you want the layers saved. After a few minutes, the full export will be complete.
At the end of this process, you have a stacked orthomosaic with pansharpened multispectral bands. The next step is to ask what other products you want from your data. For more information on this, you can consult our article on generating additional outputs using QGIS.