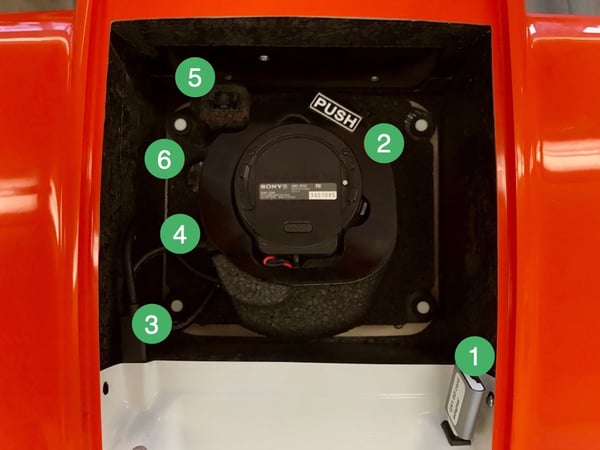
- The WingtraOne QX1 SD card is not inside the camera but inserted into the drone directly using the QX1 USB SD card adapter
- The QX1 camera is fixed with a safety ring. In normal operation, you do not have to take out the camera. Adjustment of settings and focus happens through WingtraPilot
- Universal payload connector (USB-C)
- Multiport QX1 connector (micro-USB)
- Female push-to-release button for PPK upgrade
- Manual trigger button
Important note about the QX1 camera: this camera will be called R10C in some third-party tools (e.g. in Pix4D).
Check and adjust camera settings QX1
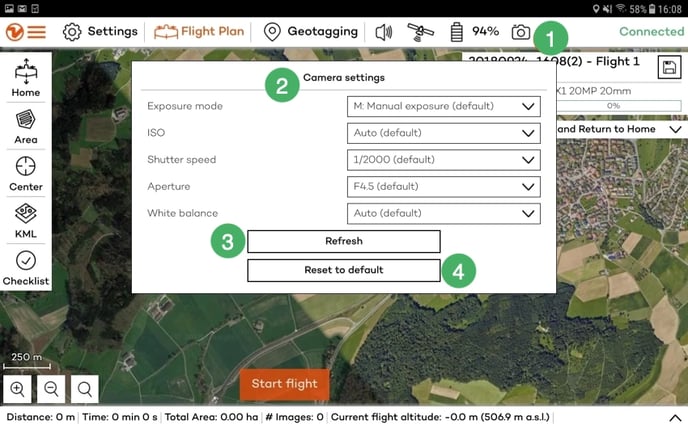
In order to change the camera settings of the WingtraOne 20MP QX1, you first need to power on the drone. Then open WingtraPilot on your tablet and connect the telemetry. Once that WingtraOne is connected to WingtraPilot, you will see a camera icon on the top right corner of WingtraPilot (1). Create a new flight plan. Select QX1 20MP as a camera option and the correct lens. Both the 20mm pancake lens and the 15mm Voigtländer lens are supported.
To change the camera settings, click on the camera icon (1) and a tab pops up shown in the image above. Here you can find a list of all the parameters that you can change. You can click on every parameter (2) and choose the value that suits your needs best. In case the parameters do not update, use the refresh option (3). Furthermore, you can reset the parameters to default values (4).
/tables/QX1_settings.png)
The default settings in the table above are valid for both, the 20mm and 15mm lenses, and give good results in a large range of light conditions. In case of very dark conditions, you can increase shutter time (do not go beyond 1/1000s). And in case of very bright conditions, you can decrease the shutter time (e.g. to 1/4000s).
The focus of the QX1 20mm lens is calibrated for every camera individually before delivery. In the unlikely case that the lens was out of focus and you captured blurry images during a flight, WingtraPilot offers a focus calibration feature. For the 15mm lens, you adjust the aperture value and focus on the lens. Make sure that the focus ring on the lens is turned to infinity.
Remove QX1 with 15mm Voigtländer lens for transport—the 15mm Voigtländer lens protrudes from the payload compartment of WingtraOne. For WingtraOne operation this is perfectly fine, for transport this is not always the case. We therefore recommend to remove the camera from the drone when transporting it. To do so, unplug the multi-port connector (4), press the safety ring that holds the QX1 camera on the push button (2) and remove the camera.
WingtraOne QX1 preflight check
On the pre-flight checklist you will see a clickable field: "Camera: Click here to check the camera." Once you press it, the camera will check that the SD card is inserted correctly and that the drone and camera are connected and work together reliably. This process can take some time, please be patient until the button turns green. In case the button turns red, first check that the SD card is inserted correctly and that the lens is not covered by its lid. Then try again.
If you still run into trouble, please double-check the WingtraOne QX1 troubleshooting section before submitting a support request.
Best practices for flying with the QX1 camera
The maximum front overlap for a given height above ground is limited by the camera's minimal triggering interval. When flying below 100 m above ground the maximum frontal overlap you can set so that there are no missing images is below 70%. This is not enough to get a high-quality end result with the post-processing software.
In order to achieve better results when flying with the QX1 camera, we can recommend a few tips:
- Set higher side overlaps
- Increase the default 70% percent side overlap to 80% side overlap
- Fly the area with cross flight lines
- Change the flight direction in a way that the flight lines that are perpendicular to those of the previous flight.
- Increase the flight height above ground if this is possible
- Increasing the flight height will allow you to set the higher front overlap