Rebinding workflow via WingtraAPP
|
Time required |
5 min |
| Difficulty | Easy |
| Equipment |
WingtraRAY, TX10 75 mm Torx screwdriver, WingtraAPP/tablet, telemetry antenna (GDT) |
Step-by-step instructions
- Connect the GDT to the tablet.
- Open WingtraAPP on the tablet, navigate to the Fleet page, and select the drone you want to bind the GDT to. Click Rebind telemetry.
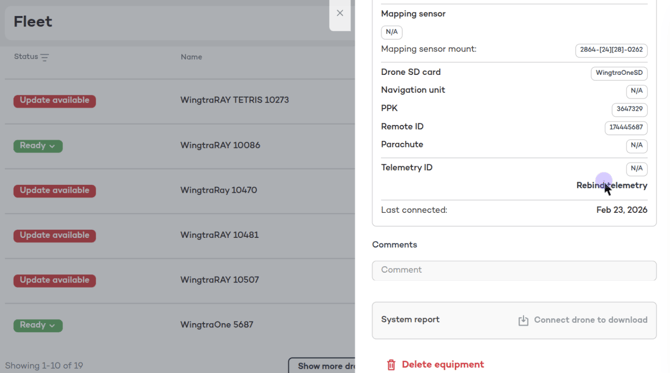
- Retrieve the drone’s Telemetry ID, which is a 9-digit number:
- If you have connected to the drone before, WingtraAPP will show the Telemetry ID. In this case, continue with step 5.
- If the Telemetry ID is not shown (N/A), continue with step 4.
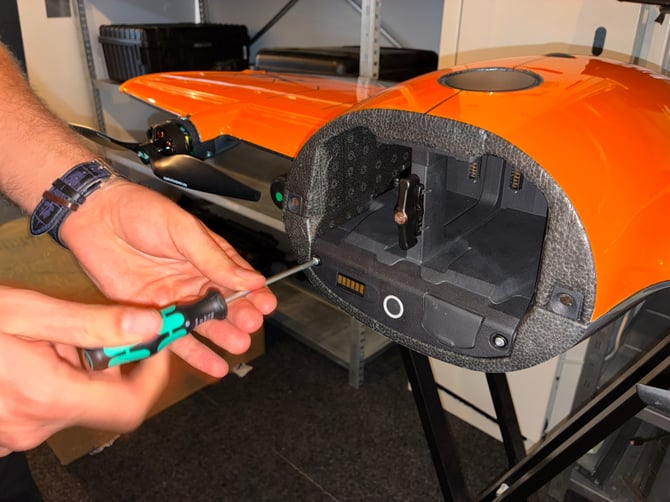
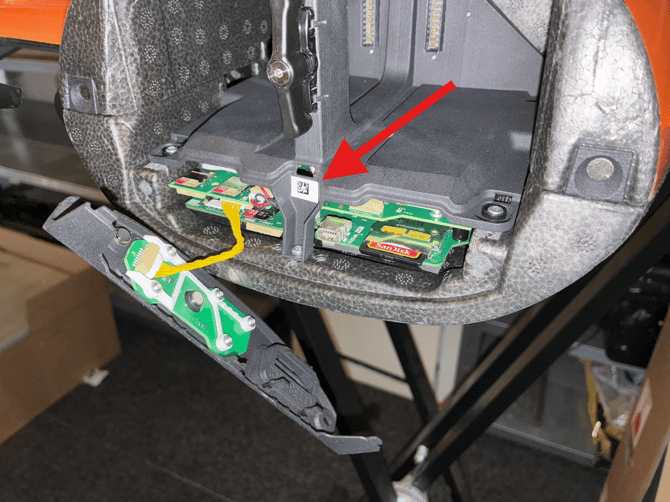
- Unscrew the electronics front panel and use a QR-code scanning app on your phone to retrieve the Telemetry ID by scanning the data matrix.
- Enter the Telemetry ID and click Rebind. After a few seconds, you should see a success message and the telemetry connection should be established.
Note: If no drone is listed under the Fleet tab, rebinding through WingtraAPP is not possible.
Legacy workflow (WingtraPilot/WingtraOne)
|
Time required |
20 min |
| Difficulty | Moderate |
| Equipment | WingtraOne, TX10 75 mm Torx screwdriver, tablet, GDT antenna |
This process can be used If the GDT and a drone are not binded (paired) or there is a requirement for replacing the GDT because it might have been broken or lost, or the GDT/drone is DOA and replacement is sent out, or in some instances, which we encountered before, when the distributor mixes drones and pilot boxes they have on stock and sends out to the customer mixed pairs (e.g. drone ID 2887 and pilot box with GDT ID 2901) so it is necessary to bind the drone and GDT with different ID’s.
Would this procedure work if the GDT is DOA?
No. The WingtraPilot would not have the GDT network identifier logged. In case of GDT being DOA then refer the customer to option 2.
Relevant hardware
This procedure can be applied to GEN I V3 (2.4GHz) and GEN II drones and for it to work you will require the GDT network identifier (ID), and there are three ways of retrieving it.
Step 1 - Retrieve the GDT identifier
This procedure will not work on V2 (868 and 915 MHz) drones
There are three options for retrieving the GDT network identifier (referred to later as ID number):
- Option 1 - Through the WingtraExplorer - Only for Wingtranauts and distributors with access to WingtraExplorer
- For this option, you will require the .log file from the flight logs, so this option might not be applicable to the DOA drones.
- Download the flight logs (it doesn’t have to be a specific log file)
- Open the log file in WingtraExplorer
- Go to the Parameters tab
- Type in “mhp” in the search bar
- You should see the row saying “MHP_NETWORK_ID” and a nine-digit number. Write that number down.
If the MHP_NETWORK_ID number is 1234567890 then in this session the GDT and drone were not connected so the actual MHP_NETWORK_ID number was not logged.
- Option 2 - Applicable to GENII and GEN I V3 (2.4GHz)units (above fw v3.0.1)
- By scanning the autopilot QR code below the e-cover
- Depending on the version of the drone at hand (with or without the PPK module) you *will perhaps need to follow instructions on how to remove the e-cover in the payload bay. On how to remove the e-cover click here for GEN I and for GEN II you can see it in the video below.
- If the drone has the PPK module, remove the PPK module and e-cover.
- Once the e-cover is removed you can find the QR code on the FMU
- Scan the QR code with your smartphone and the number showing the smartphone (starting with 25 plus seven digits) is the GDT identifier
*If you have PPK module
- Option 3 - From WingtraPilot (GEN II and GEN I V3 units)
This method will work only in case the tablet was last connected to the drone/GDT on which you are doing the procedure. If the tablet was connected to a different drone, you will see the ID of that other drone.
-
- Open Wingtra pilot and go to the Settings tab
- Open the Advanced options section and change the User mode from Basic to Wingtra (password: wingtra.1)
- Then go to the Telemetry Settings tab located on the left under which you will be able to see the Network ID
- This is the most simple way and most foolproof so this would be the recommended way of doing it for end-users.
- See the video below:
Step 3 - Binding the GDT to the drone
Once you have retrieved the GDT identifier, follow the next steps to bind the GDT to the drone:- Plug the telemetry into the tablet and make sure that the drone is not powered up.
- Open Wingtra pilot and go to the Settings tab.
- Open the advanced options section and change the User mode from Basic to Wingtra (password: wingtra.1).
- Go to "Settings" -> "Telemetry Settings" tab -> "Standard settings".
- There, in the "Network ID" field, type in the number found in the MHP_NETWORK_ID row, and click on "Set Wingtra standard settings on 2.4 GHz telemetry".
- Wingtra Pilot will show a green text saying “success [...]”. If not, please repeat steps 1-5. The final control is to power up the drone and check whether it gains a connection, if it does you have successfully binded the GDT and the drone.